Using the Control Data Editor
The control data editor is the first window that opens when ACDB starts. When the program first starts, it will look like this:
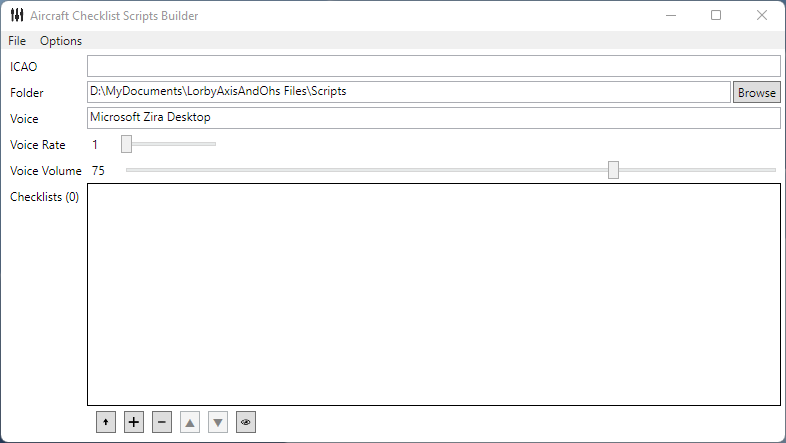
Starting at the top and working down, you will see the main menu where you will find expected operations like New, Open, Save, Save as, etc.
Below are three text fields. The first file is labeled "ICAO" to collect a short name of the aircraft the checklists you will write are for. Technically, the name does not have to be the ICAO, but this field is used to create a directory for storing the scripts that the program will build, so it needs to be a name that is valid for a folder name. We recommend that you keep it simple, use only letters and numerals, and avoid special characters altogether.
The "Folder" field should specify a path to a folder where ACDB will create the aircraft's folder. To run as a script in AAO, the folder should be AAO's script folder, so the default value for this field will point to "LorbyAxisAndOhs Files\Scripts" in your "My Documents" folder.
The "Voice" field is to specify the voice that AAO should use to read the checklist scripts. This field should match one of the names of a TTS voice installed on your computer. To get a list of names that can be used in this field, follow these steps:
- Open a PowerShell prompt on your desktop.
- Execute these three lines:
Add-Type -AssemblyName System.speech
$speak = New-Object System.Speech.Synthesis.SpeechSynthesizer
$speak.GetInstalledVoices().VoiceInfo.Name
You will get a list of TTS voices that you can use in the "Voice" field, possibly like this:
Microsoft David Desktop
Microsoft Server Speech Text to Speech Voice (en-AU, Hayley)
Microsoft Server Speech Text to Speech Voice (en-CA, Heather)
Microsoft Hazel Desktop
Microsoft Server Speech Text to Speech Voice (en-IN, Heera)
Microsoft Server Speech Text to Speech Voice (de-DE, Hedda)
Microsoft Server Speech Text to Speech Voice (en-US, Helen)
Microsoft Server Speech Text to Speech Voice (en-US, ZiraPro)
Microsoft Zira Desktop
Microsoft Server Speech Text to Speech Voice (es-MX, Hilda)
Microsoft Server Speech Text to Speech Voice (fr-CA, Harmonie)
Microsoft Server Speech Text to Speech Voice (fr-FR, Hortense)
Microsoft Server Speech Text to Speech Voice (it-IT, Lucia)
Microsoft Server Speech Text to Speech Voice (pl-PL, Paulina)
Microsoft Server Speech Text to Speech Voice (pt-BR, Heloisa)
Microsoft Server Speech Text to Speech Voice (pt-PT, Helia)
Your list, however, will probably look different. Depending on whether you have installed any additional voices on your computer, it could be smaller or larger.
Below the "Voice" field are two slider controls to set the "Voice Rate" (or speed) of the voice and the "Voice Volume."
And then finally, there is a list box where checklists can be added, removed, and manipulated with the list control buttons at the bottom of the list box. Each added checklist will look like this:

Within these controls, you can specify a checklist "Name" (a short name to identify the checklist) and a "Title" (possibly the same as "Name," but usually a little longer). An example of "Name" and "Title" might be "preflight" and "preflight inspection." These are the same as the "Name" and "Title" fields in the Checklist Data Editor.
At the bottom right of the checklist, control is an "Open" button. If clicked, that button will open a Checklist Data Editor where you can enter additional information about that checklist.