-
Notifications
You must be signed in to change notification settings - Fork 14
preface chapter1 の修正 #50
New issue
Have a question about this project? Sign up for a free GitHub account to open an issue and contact its maintainers and the community.
By clicking “Sign up for GitHub”, you agree to our terms of service and privacy statement. We’ll occasionally send you account related emails.
Already on GitHub? Sign in to your account
Open
yas-ako
wants to merge
4
commits into
refactor/file-structure
Choose a base branch
from
refactor/0-1
base: refactor/file-structure
Could not load branches
Branch not found: {{ refName }}
Loading
Could not load tags
Nothing to show
Loading
Are you sure you want to change the base?
Some commits from the old base branch may be removed from the timeline,
and old review comments may become outdated.
Open
Changes from all commits
Commits
File filter
Filter by extension
Conversations
Failed to load comments.
Loading
Jump to
Jump to file
Failed to load files.
Loading
Diff view
Diff view
There are no files selected for viewing
This file contains hidden or bidirectional Unicode text that may be interpreted or compiled differently than what appears below. To review, open the file in an editor that reveals hidden Unicode characters.
Learn more about bidirectional Unicode characters
This file contains hidden or bidirectional Unicode text that may be interpreted or compiled differently than what appears below. To review, open the file in an editor that reveals hidden Unicode characters.
Learn more about bidirectional Unicode characters
| Original file line number | Diff line number | Diff line change |
|---|---|---|
| @@ -1 +1,108 @@ | ||
| # 1.1-A Macの環境構築 | ||
|
|
||
| # Macの環境構築手順 | ||
|
|
||
| ## Step 1: Clang Install | ||
|
|
||
| 1. 「⌘ + スペース」 | ||
| 2. 「Spotlight を検索」が表示される | ||
|  | ||
|
|
||
| 3. **ターミナル** と入力 | ||
| 4. ターミナルを起動する。 | ||
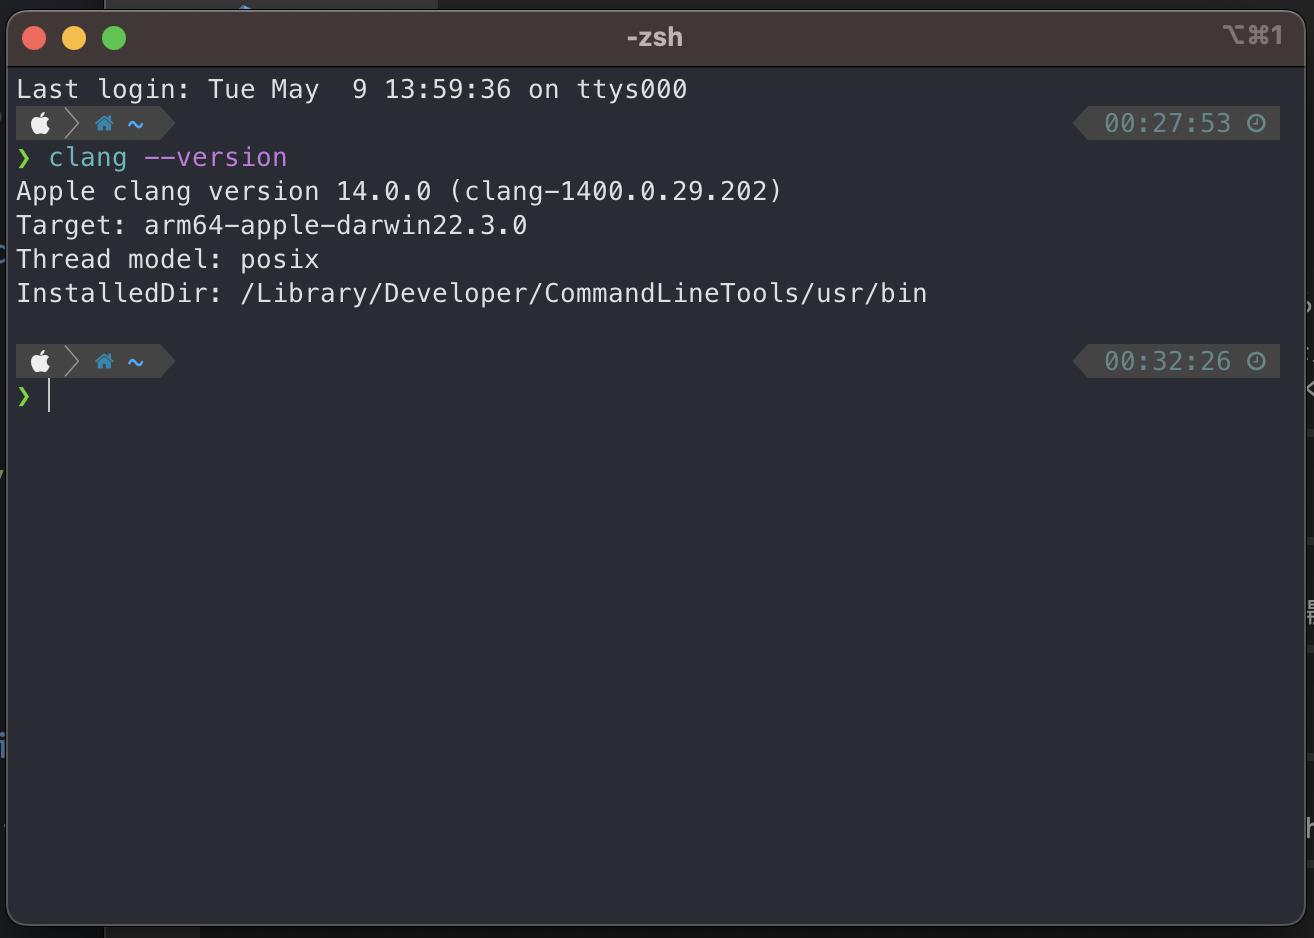
| 5. `clang --version` と入力 | ||
|
|
||
| ::: tip | ||
| なにかインストールを求められた時は、指示に従ってインストールしてください。心配なら TA を呼んでください。 | ||
| ::: | ||
|
|
||
| 6. `command not found` と表示されなければOK | ||
|  | ||
|
|
||
|
|
||
| 7. traQ の tasks チャンネルで :cpp: スタンプをつける | ||
|
|
||
| ## Step 2: Install VSCode | ||
|
|
||
| 1. https://code.visualstudio.com/download でダウンロード | ||
|
|
||
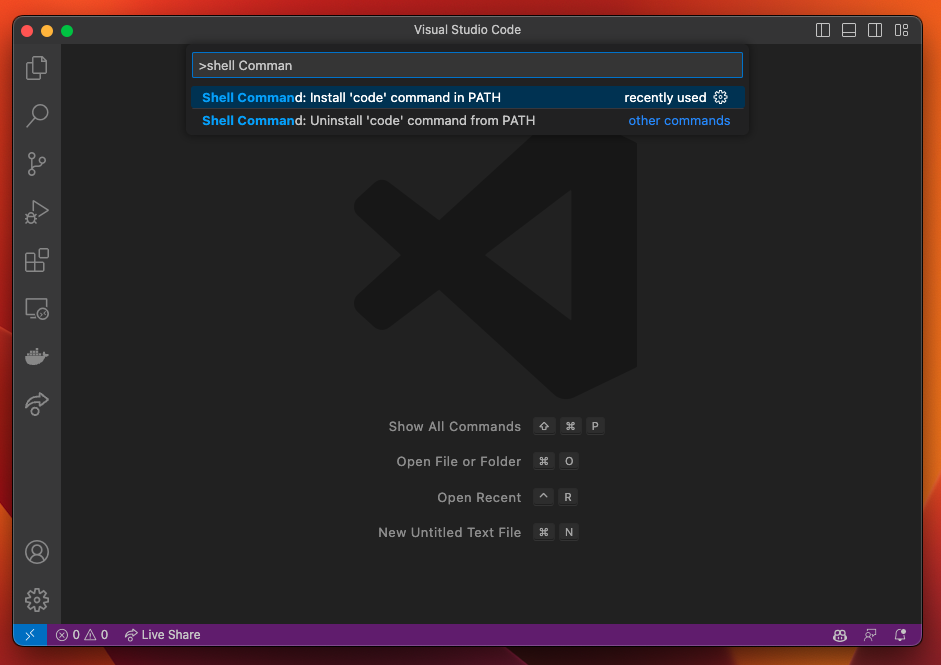
| 2. `⌘+Shift+P` を同時押しして、出てきた画面に `shell command` と入力する。 `Install 'code' command in PATH` を選択。 | ||
|
|
||
|  | ||
|
|
||
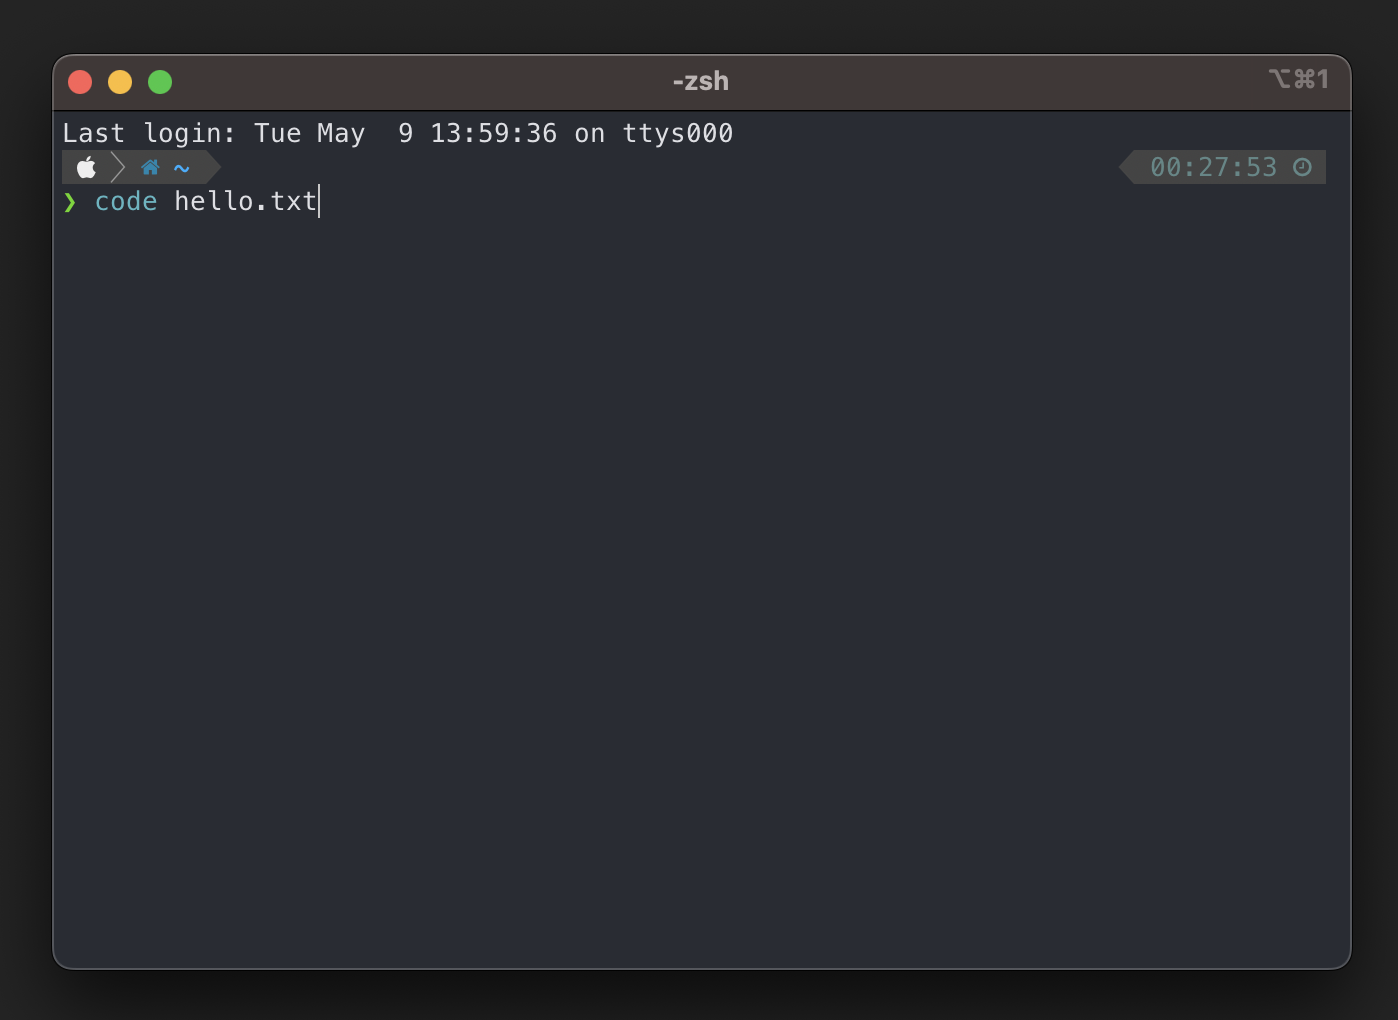
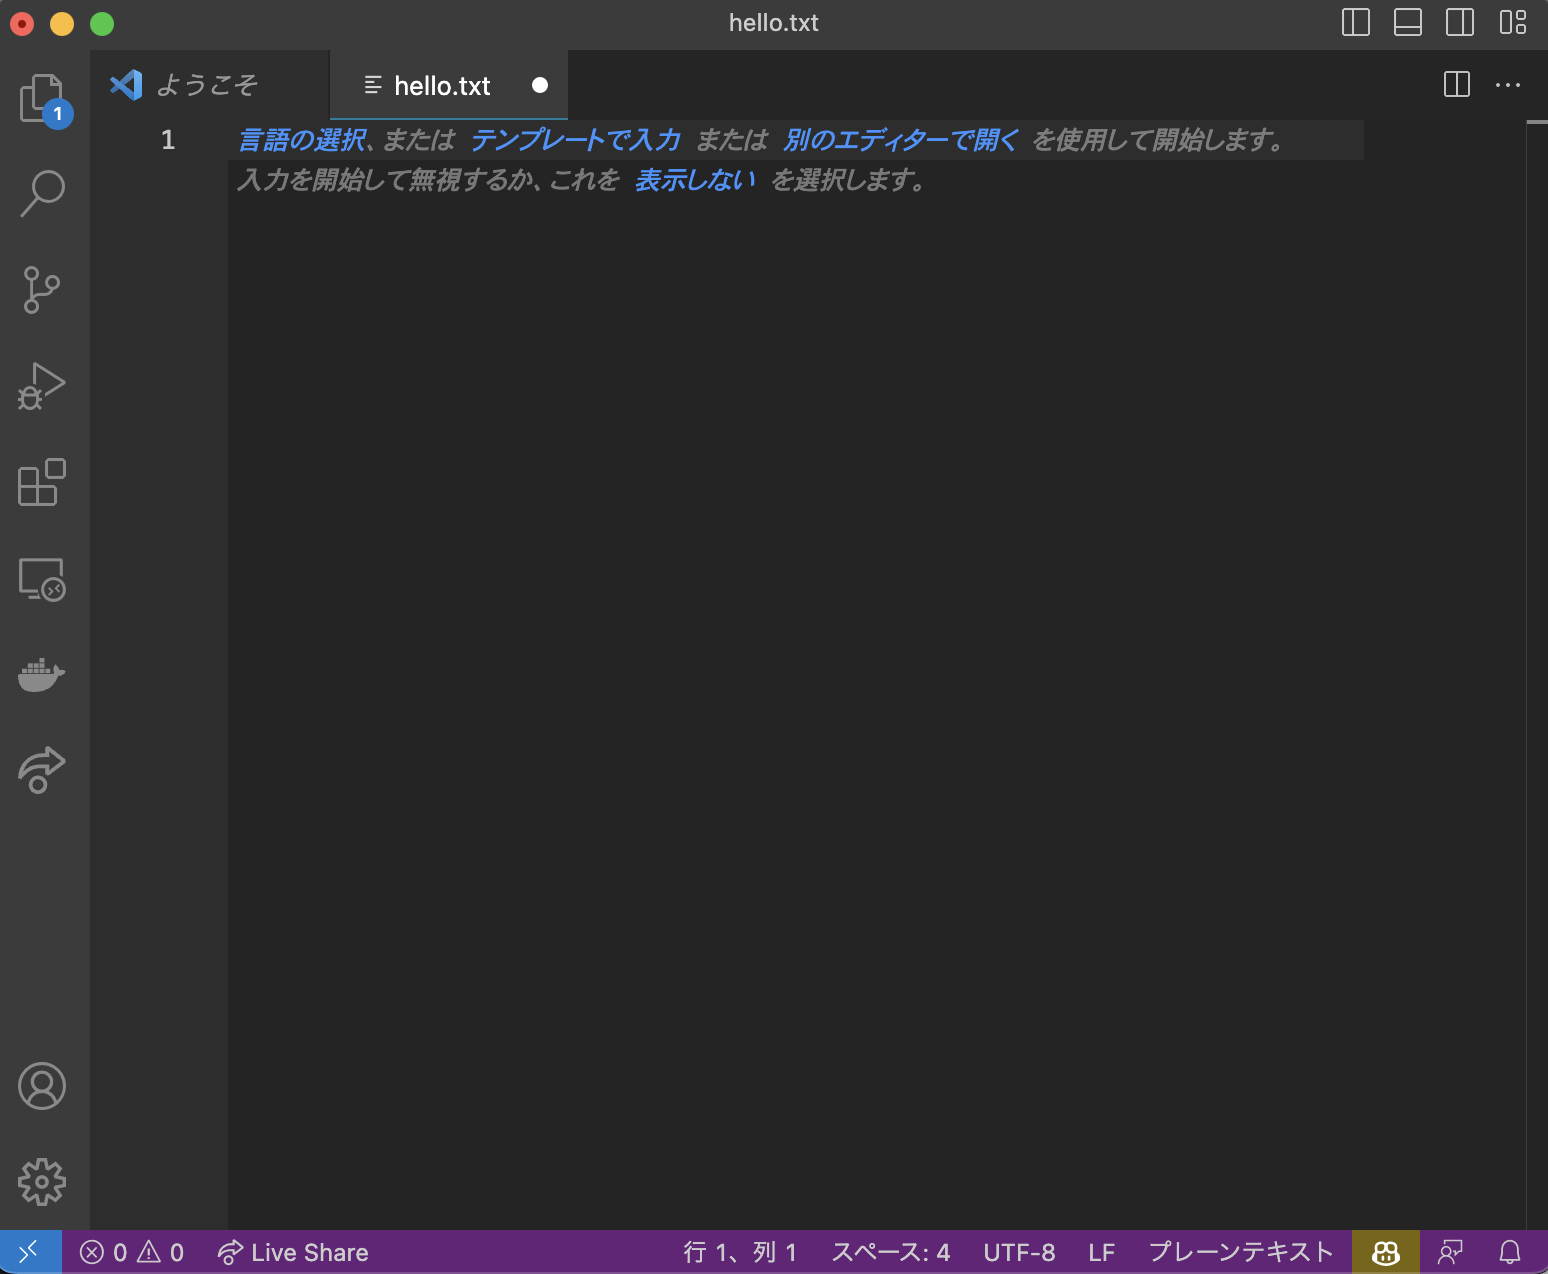
| 3. ターミナルで `code hello.txt` を入力し、VSCode が起動できたら成功! | ||
|  | ||
|  | ||
|
|
||
| 4. `⌘+,` を押して、出てきた画面に「Auto Save」と入力 | ||
|
|
||
| 5. 「Files: Auto Save」の項目を探して、「afterDelay」に変更する | ||
| 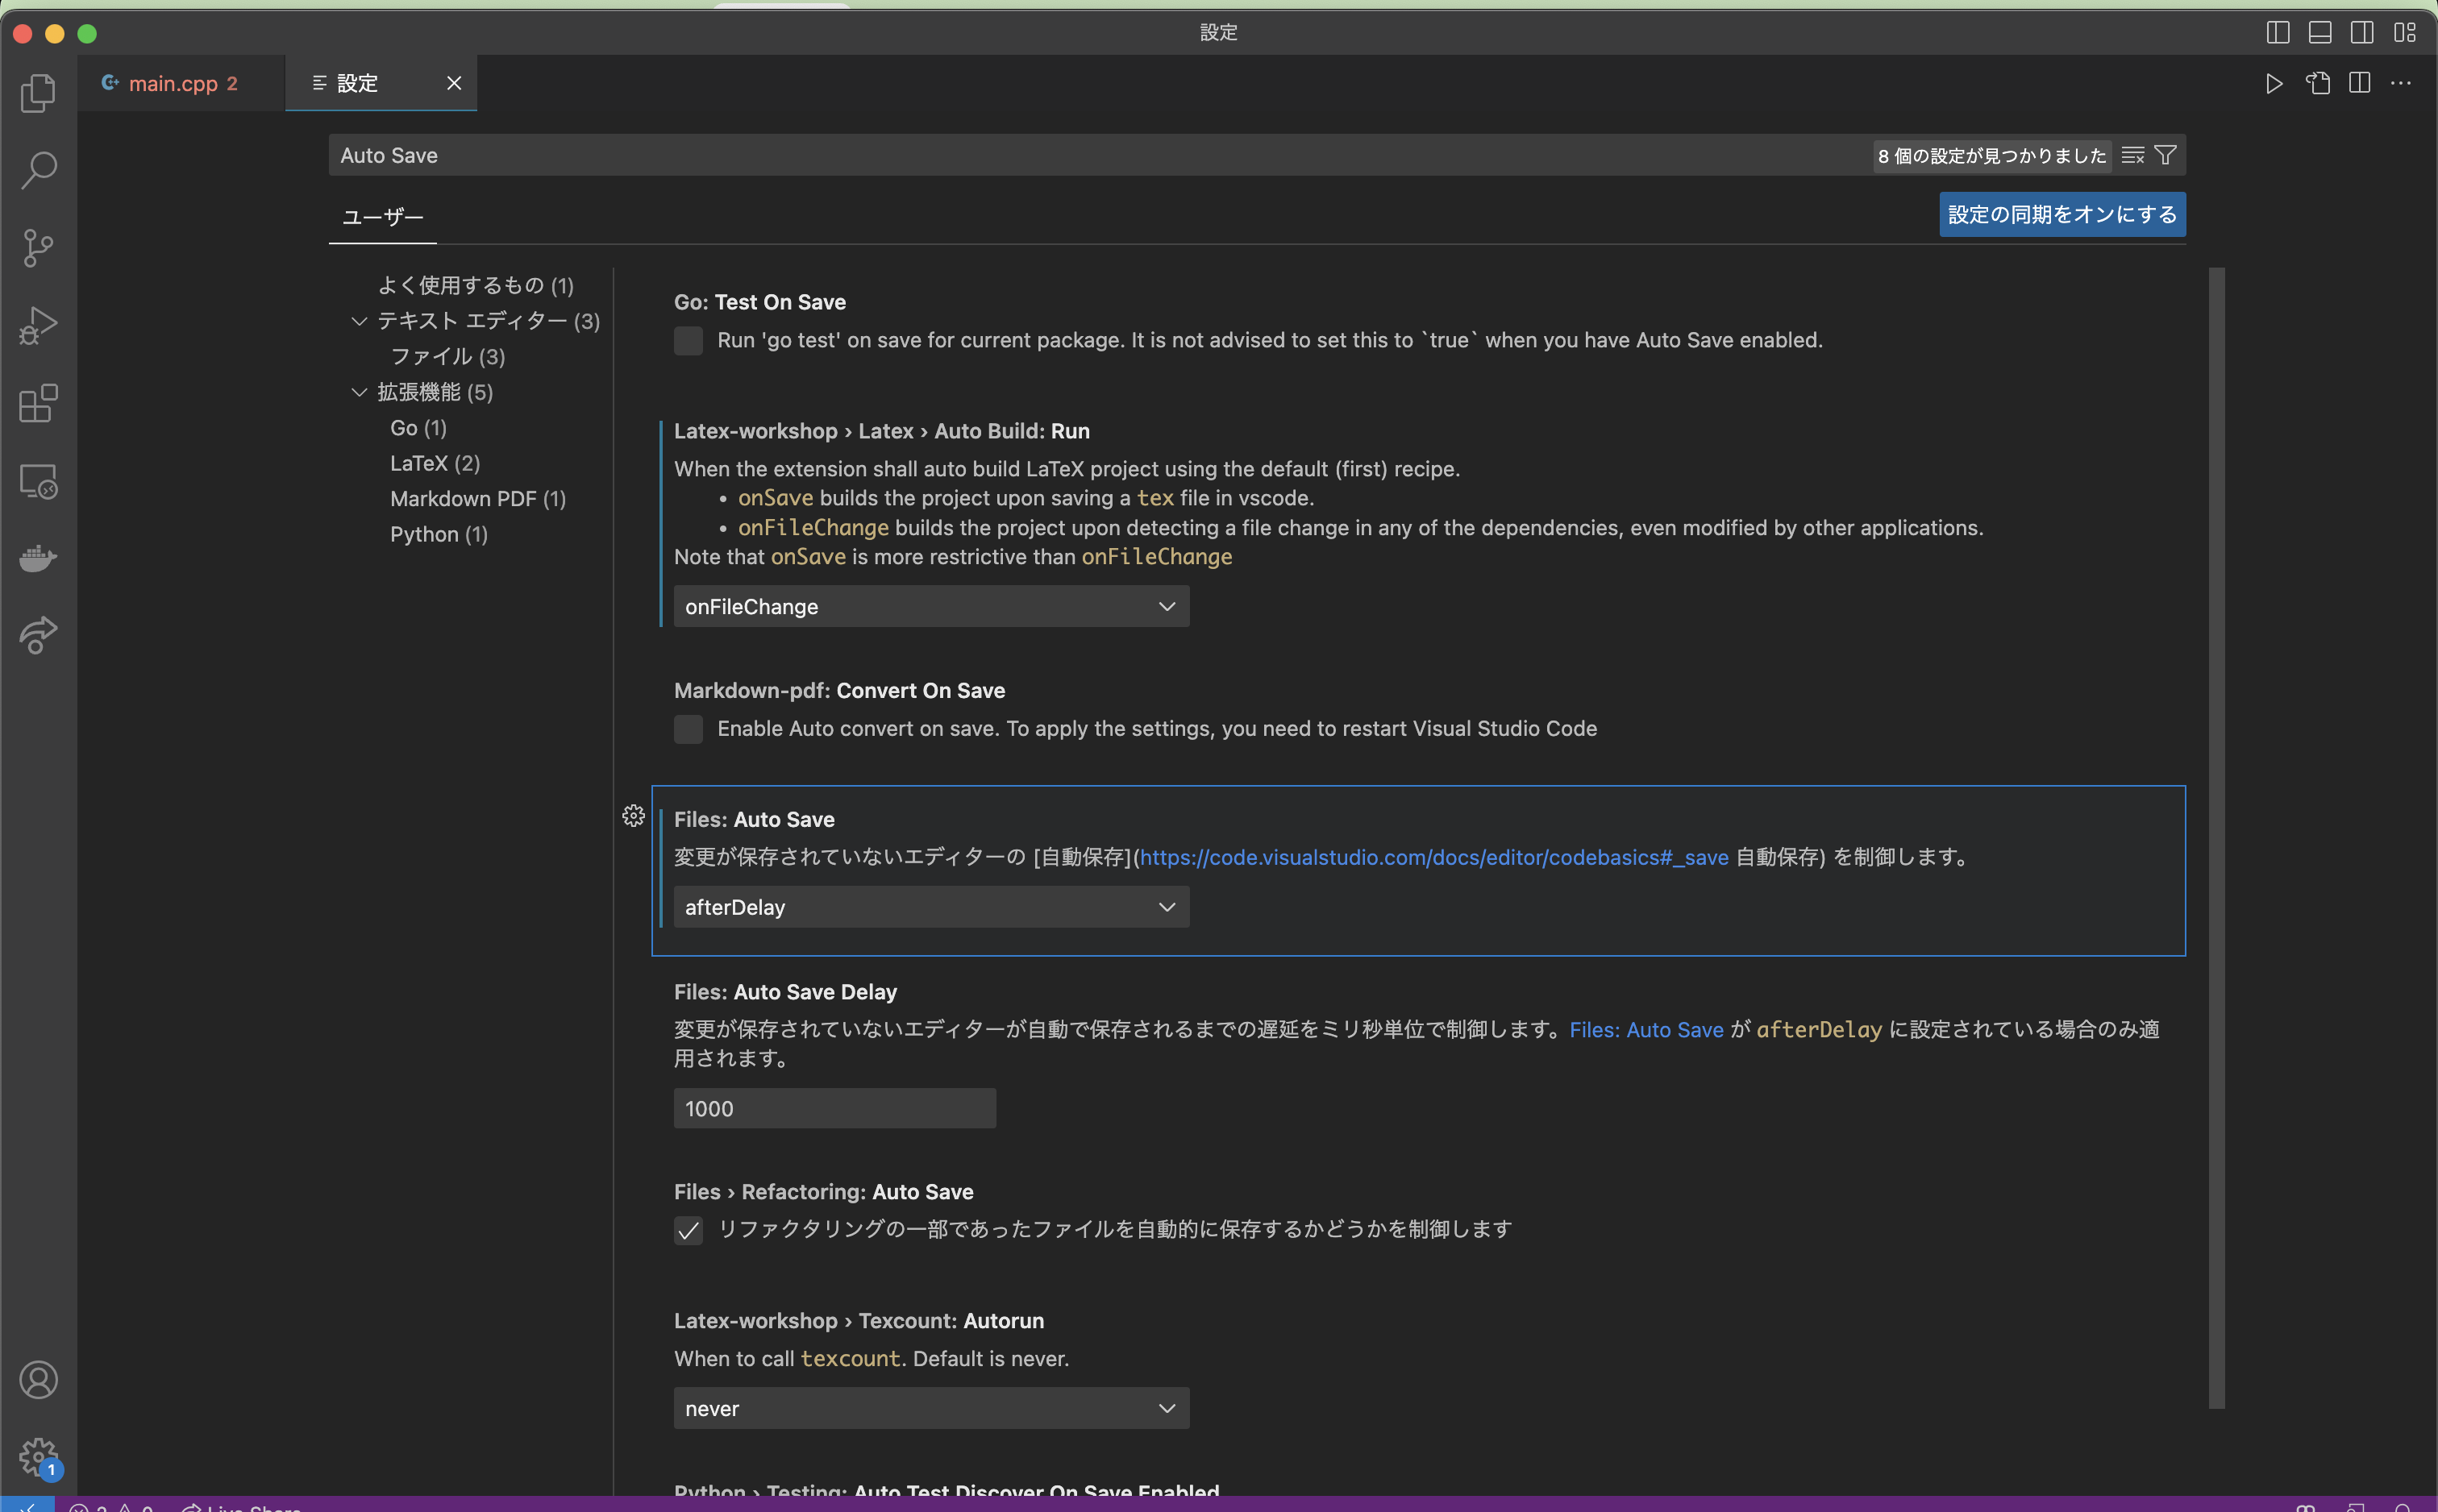 | ||
|
|
||
|
|
||
| 6. `⌘+Shift+X` を押して、出てきた画面に `Japanese` と入力。 `Japanese Language Pack for Visual Studio Code` をインストールする。インストール完了後、右下の `Change Language and Restart` を押して VSCode を再起動する。 | ||
| 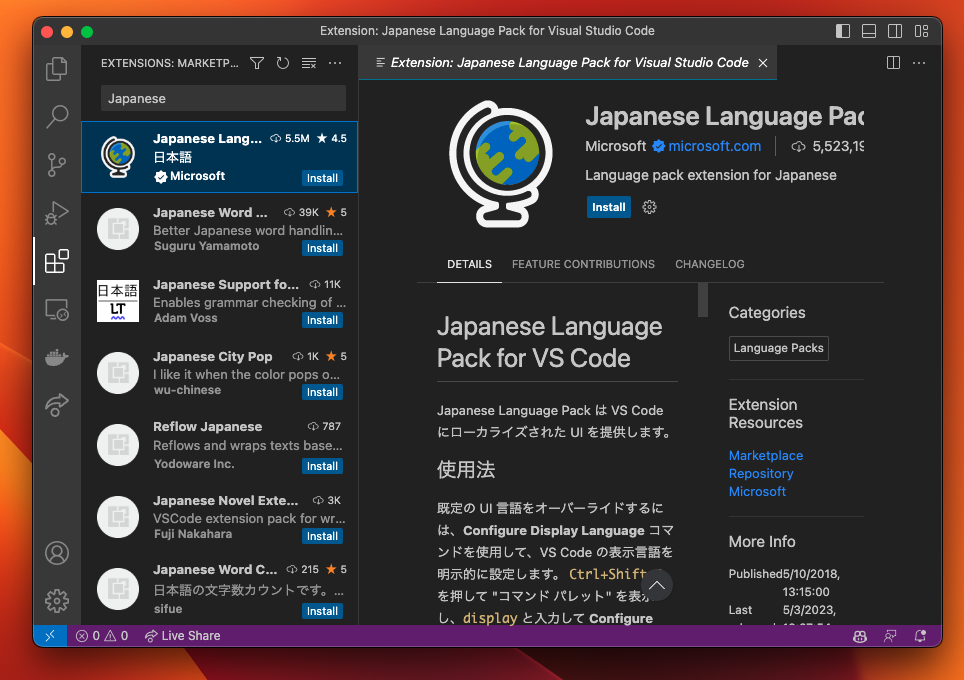 | ||
|
|
||
| 5. 日本語でVSCode が表示されるようになったら :vscode: スタンプをつける | ||
|
|
||
| ## Step 3: 拡張機能の設定 | ||
|
|
||
| 1. VSCodeの 画面で `⌘` + `Shift` + `X` | ||
|
|
||
| 2. 「C++」と入力し、「C/C++ Extension」の拡張機能を追加 | ||
|
|
||
| 3. `Code Runner` と入力して、「Code Runner」拡張機能を追加 | ||
|
|
||
| 4. `⌘` + `,` で設定を開く。下記画像の赤丸で囲んだ部分を押して `settings.json` を開く。 | ||
|  | ||
|
|
||
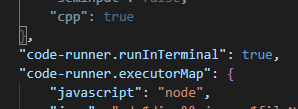
| 5. もし`"cpp": `で始まる行がなければ、一番最後の行の1つ前の行( `}` の前!)に次のコードを追加する。その前の行に `,` がなかったら追加する。 | ||
|
|
||
| ``` | ||
| "code-runner.executorMap": { | ||
| "cpp": "cd $dir && clang++ -std=c++17 $fileName -o $fileNameWithoutExt && $dir$fileNameWithoutExt", | ||
| }, | ||
| ``` | ||
|
|
||
|  | ||
|
|
||
| ::: tip | ||
|
|
||
| もしすでに`"cpp": ` で始まる行があった場合、以下のように`g++` を `clang++` に置き換える。 | ||
|
|
||
| ```diff | ||
| - "cpp": "cd $dir && g++ $fileName -o $fileNameWithoutExt && $dir$fileNameWithoutExt", | ||
| + "cpp": "cd $dir && clang++ -std=c++17 $fileName -o $fileNameWithoutExt && $dir$fileNameWithoutExt", | ||
| ``` | ||
|
|
||
| ::: | ||
|
|
||
| 6. `"code-runner.executorMap": {` の行の前に `"code-runner.runInTerminal": true,` を書く(コピペ推奨!!) | ||
|
|
||
| 7. こんな感じになっていれば OK | ||
|  | ||
|
|
||
| 8. ターミナル を開き、 `code main.cpp` と入力する | ||
|
|
||
| 9. 次のように書く(コピペでも OK ) | ||
|
|
||
| ```cpp | ||
| #include <iostream> | ||
| using namespace std; | ||
|
|
||
| int main() { | ||
| cout << "Hello, World!" << endl; | ||
| } | ||
| ``` | ||
|
|
||
| 10. 画像の赤丸で実行してみる。下側の画面に `Hello, World!` が出れば成功! | ||
| 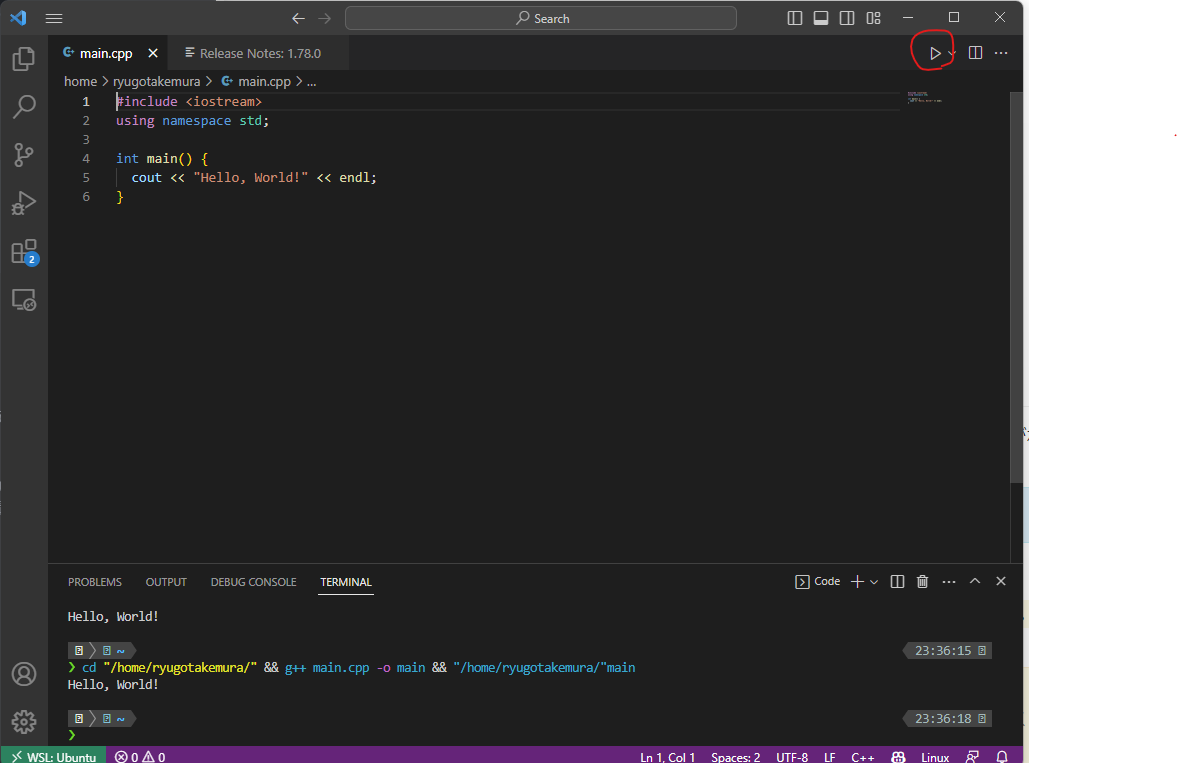 | ||
|
|
||
| ::: tip | ||
| なにか出てきた場合は、代わりに三角の隣の`v` を押して、「Run Code」を押す! | ||
|
|
||
| 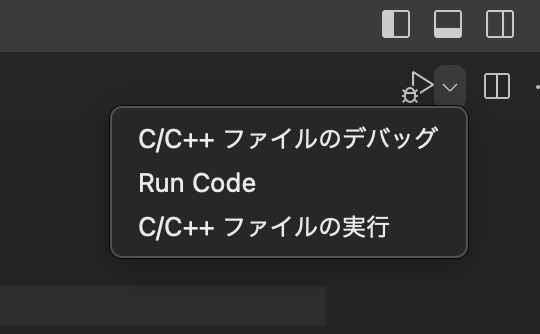 | ||
| ::: | ||
|
|
||
| 11. traQ の tasks チャンネルで :done: を押す | ||
|
|
||
| 12. 環境構築はこれで完了です!お疲れ様でした。 :blob_pyon: |
This file contains hidden or bidirectional Unicode text that may be interpreted or compiled differently than what appears below. To review, open the file in an editor that reveals hidden Unicode characters.
Learn more about bidirectional Unicode characters
| Original file line number | Diff line number | Diff line change |
|---|---|---|
| @@ -1 +1,164 @@ | ||
| # 1.1-B Windowsの環境構築 | ||
|
|
||
| # 環境構築 Windows | ||
|
|
||
| ## Step 1: Install WSL | ||
|
|
||
| 1. https://apps.microsoft.com/detail/9N0DX20HK701?hl=ja-jp&gl=JP&ocid=pdpshare で Windows Terminal をインストール(既にインストールされていれば飛ばしてOKです) | ||
|
|
||
| 1. アプリ検索の画面で、 `Terminal` と入力し 「管理者として実行」 | ||
| 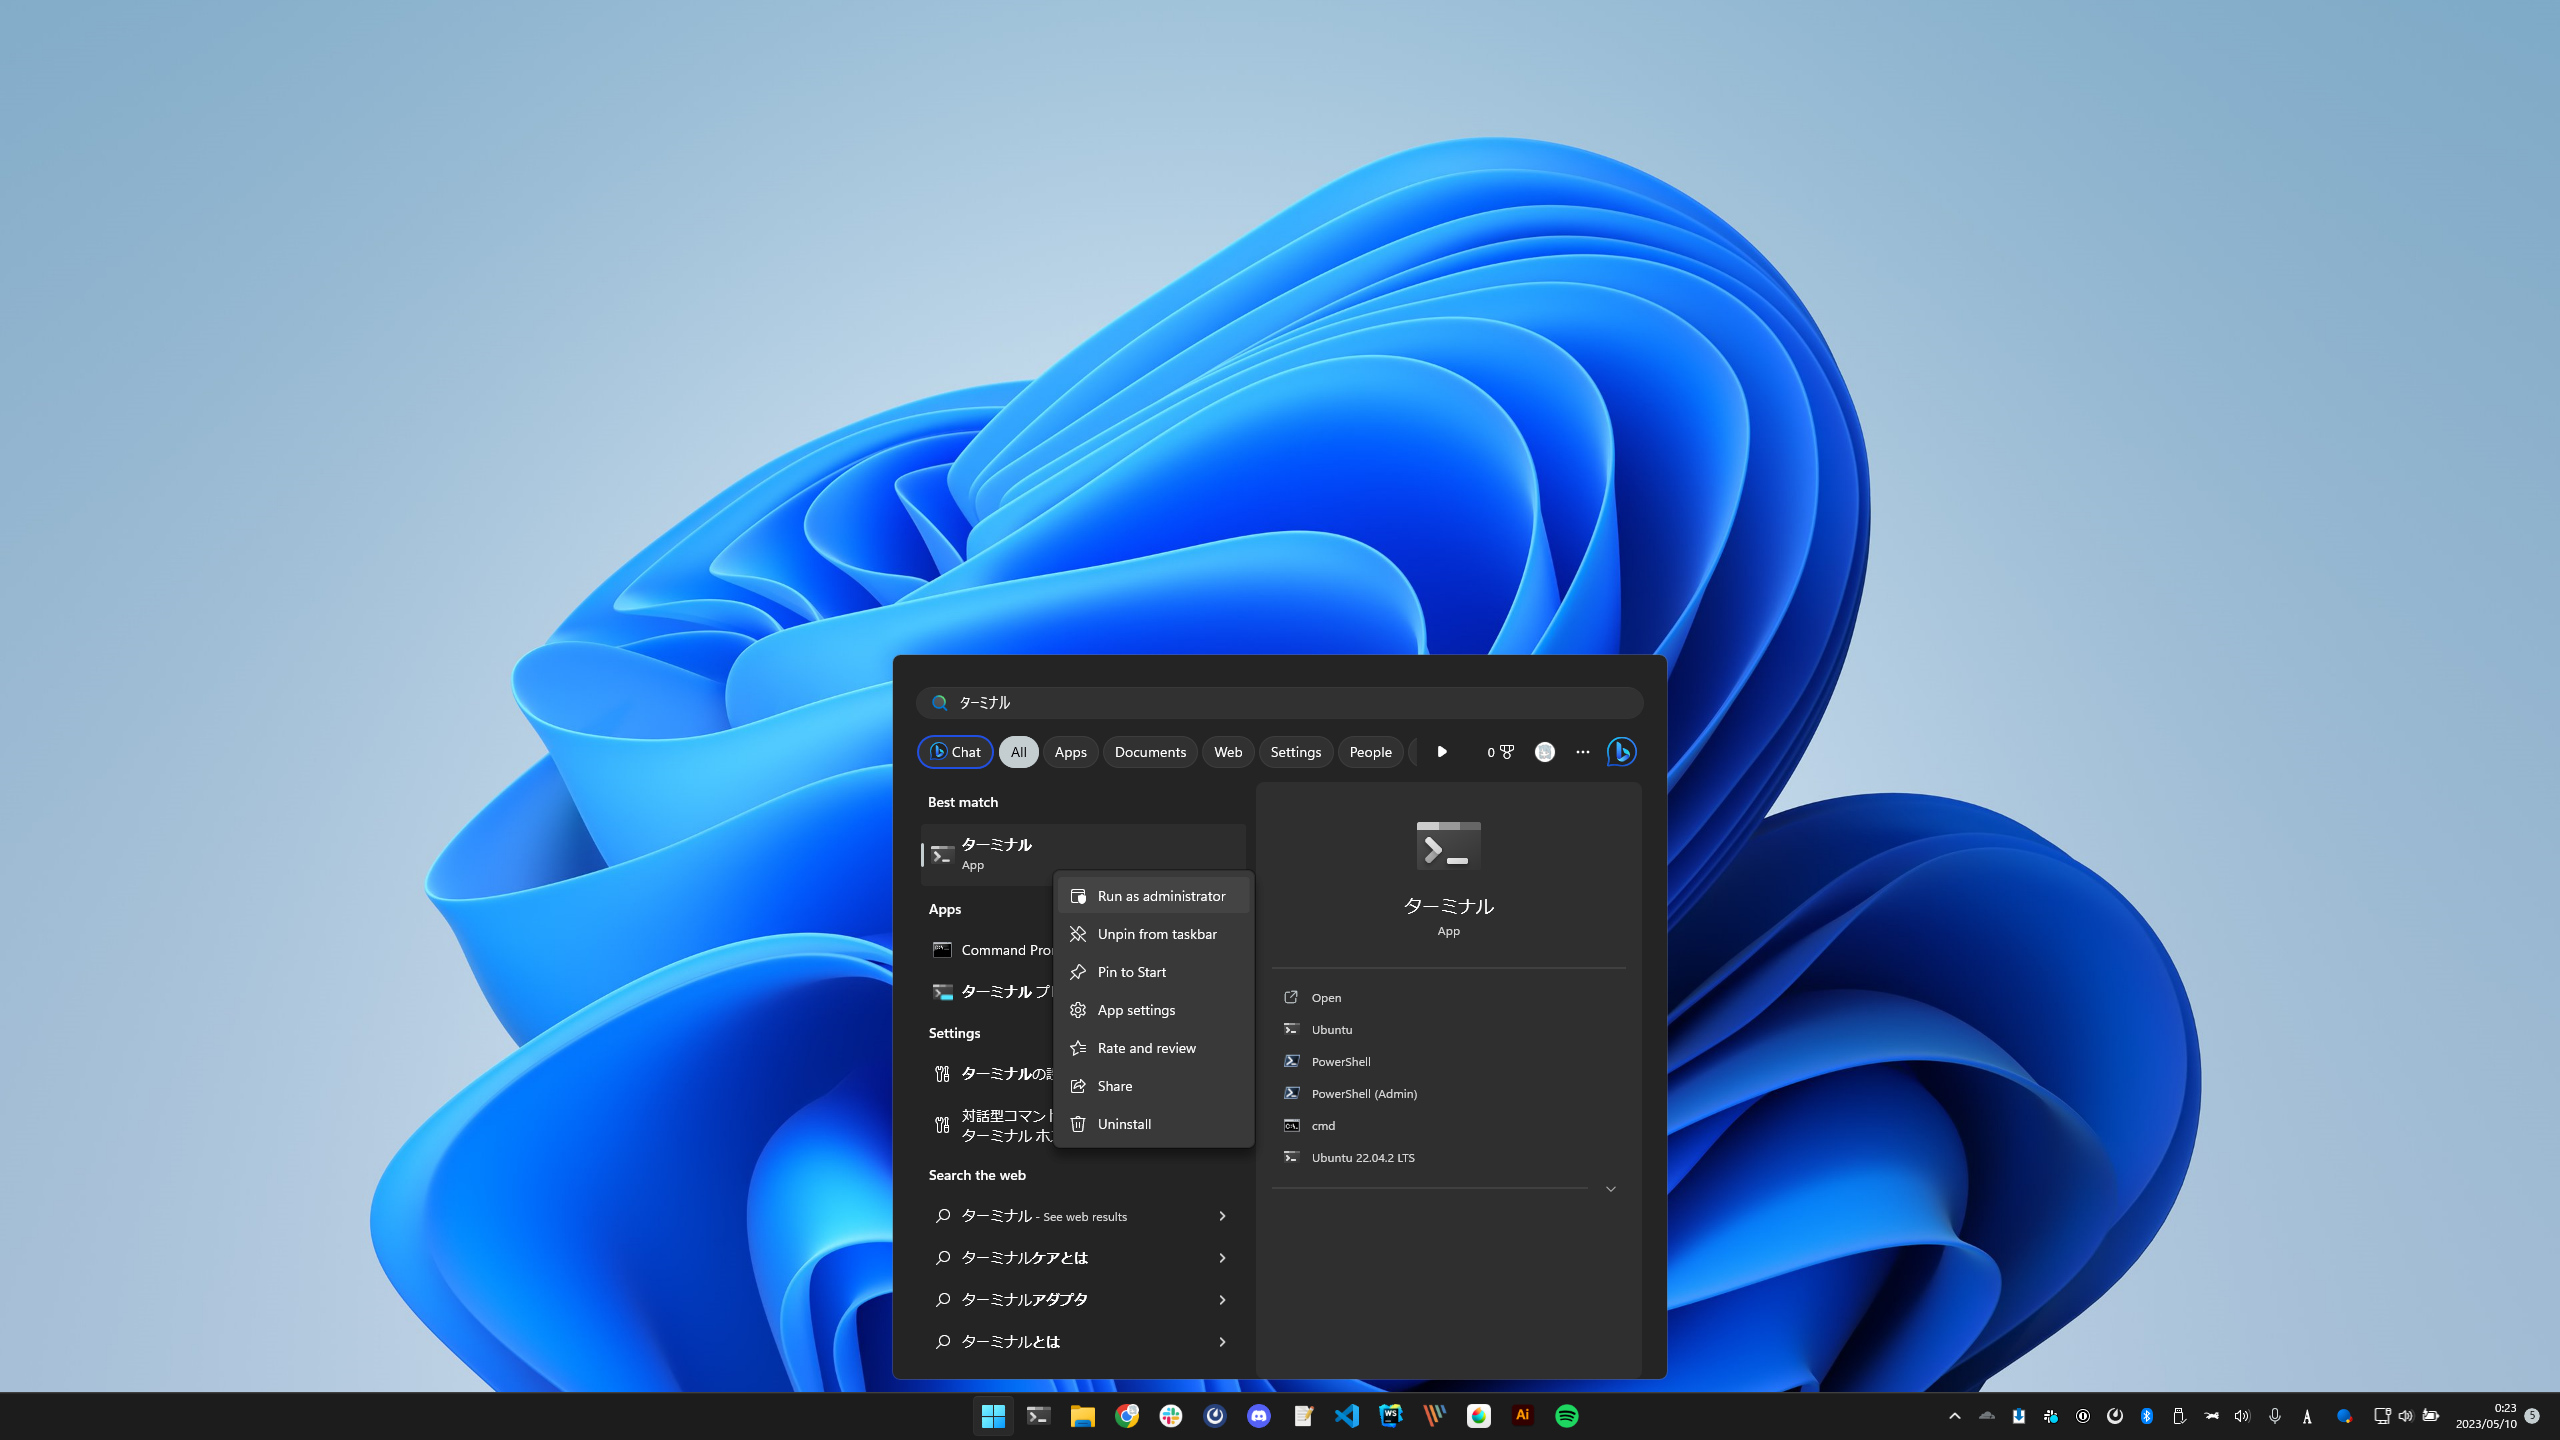 | ||
|
|
||
|
|
||
| 2. `wsl --install -d Ubuntu` と入力して、エンターキーを押す。 | ||
| 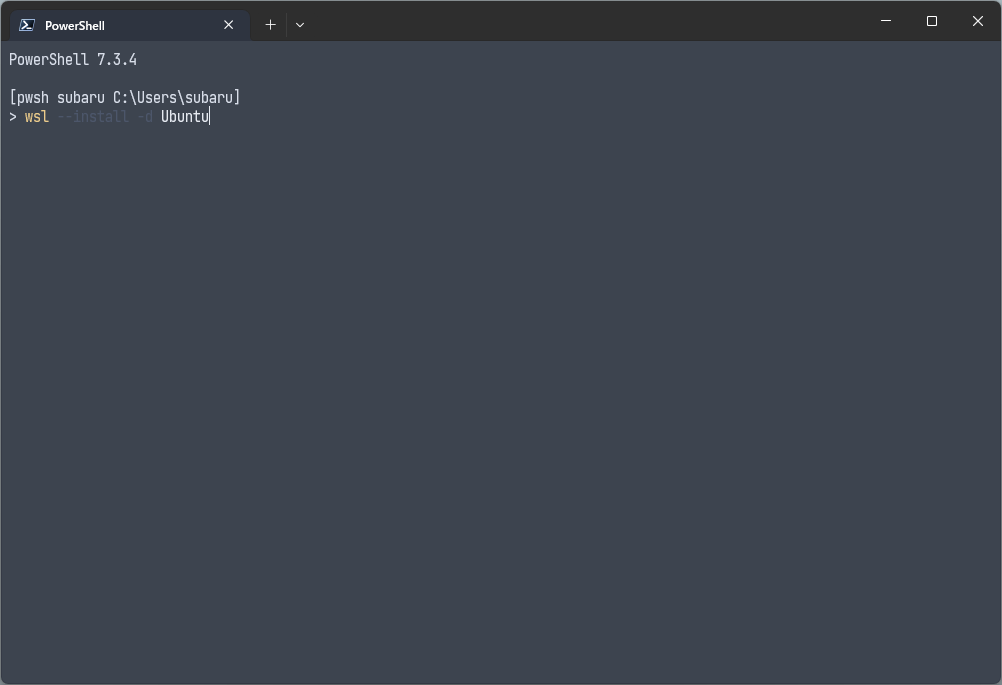 | ||
|
|
||
| :::warning TA向け | ||
| WSL インストールトラブルシューティング | ||
| https://learn.microsoft.com/ja-jp/windows/wsl/troubleshooting | ||
|
|
||
| `wsl --install` に失敗した際の手動インストールマニュアル | ||
| (Windowsバージョンの要件なども書いてあります) | ||
| https://learn.microsoft.com/ja-jp/windows/wsl/install-manual | ||
| ::: | ||
|
|
||
| :::warning TA向け | ||
| 極稀に、BIOS で virtualization 設定が切られている為に WSL がインストールできない事があります(`Please enable the Virtual Machine Platform Windows feature and ensure virtualization is enabled in the BIOS.` と表示されます) | ||
| この場合は BIOS に入って、 Advanced -> Virtualization の順で有効化してください。 | ||
| ::: | ||
|
|
||
| 3. Ubuntu のアカウント設定 | ||
| 1. ターミナルの下部に `Enter new UNIX username:` と表示されていなければ `wsl -d Ubuntu` と入力してエンターキーを押す。 | ||
| 1. それでも `Enter new UNIX username` が表示されない場合(例えば「ディストリビューションが見つからない」という内容のエラーが表示される場合)は、インストールが失敗している可能性があるので Step 1 の 1. からやり直してみる(これでも上手くいかない場合は TA を呼んでください) | ||
| 1. `Enter new UNIX username:` が表示されるので、**半角英数小文字** でユーザーネームを入れる。( `take` とか `takemura` とか `ryugo` とか短い方が良い。フォルダの名前になります) | ||
| 2. `New Password:` WSL 内で使いたいパスワードを入力。何も表示されませんが入力されています。入力できたら エンターキーを押す。 | ||
| 3. `Retype New password:` もう一度入力。 | ||
|
|
||
|  | ||
|
|
||
| 4. ウィンドウを閉じる | ||
|
|
||
| 6. スタートから Windows Terminal を起動 | ||
|
|
||
| 7. `Ctrl` + `,` で設定画面を開く | ||
|
|
||
| 8. 「規定のプロファイル」を「Ubuntu」に変更(複数あるならどれでも良い) | ||
|  | ||
|
|
||
| 9. 「保存」ボタンを押す | ||
|
|
||
| 10. Windows Terminal を閉じて、もう一度開く | ||
|
|
||
| 11. traQ の tasks チャンネルで :wsl: スタンプを押す | ||
|
|
||
| ## Step 2: Install Clang | ||
|
|
||
| 1. WSL上で `sudo apt update` | ||
|
|
||
| 3. パスワードを求められるので、WSLで設定したパスワードを入力 | ||
| 4. WSL上で `sudo apt install clang zip curl -y` を実行する | ||
| 5. `clang --version` で clang のバージョンが表示されれば成功 | ||
| 6. traQ の tasks チャンネルで :cpp: を押す | ||
|
|
||
| ## Step 3: VSCode Install & Init | ||
|
|
||
| 1. https://code.visualstudio.com/download から VSCode をインストール | ||
|
|
||
| 2. 起動後、 `Ctrl` + `Shift` + `X` を押す | ||
|
|
||
| 3. `Japanese` と入力し、 `Japanese Language Pack for Visual Studio Code` をインストール。 | ||
|  | ||
|
|
||
| 4. VSCode の右下「Change Language and Restart」を押してインストール。 | ||
|
|
||
| 5. もう一度、 `Ctrl` + `Shift` + `X` を押す | ||
|
|
||
| 6. `WSL` を入力し、 `WSL` をインストール | ||
|  | ||
|
|
||
| 7. `Ctrl+,` を押して、出てきた画面に「Auto Save」と入力 | ||
|
|
||
| 8. 「Files: Auto Save」の項目を探して、「afterDelay」に変更する | ||
|  | ||
|
|
||
| 9. ターミナルで `code hello.txt` を入力し、VSCode が起動できたら成功! | ||
| 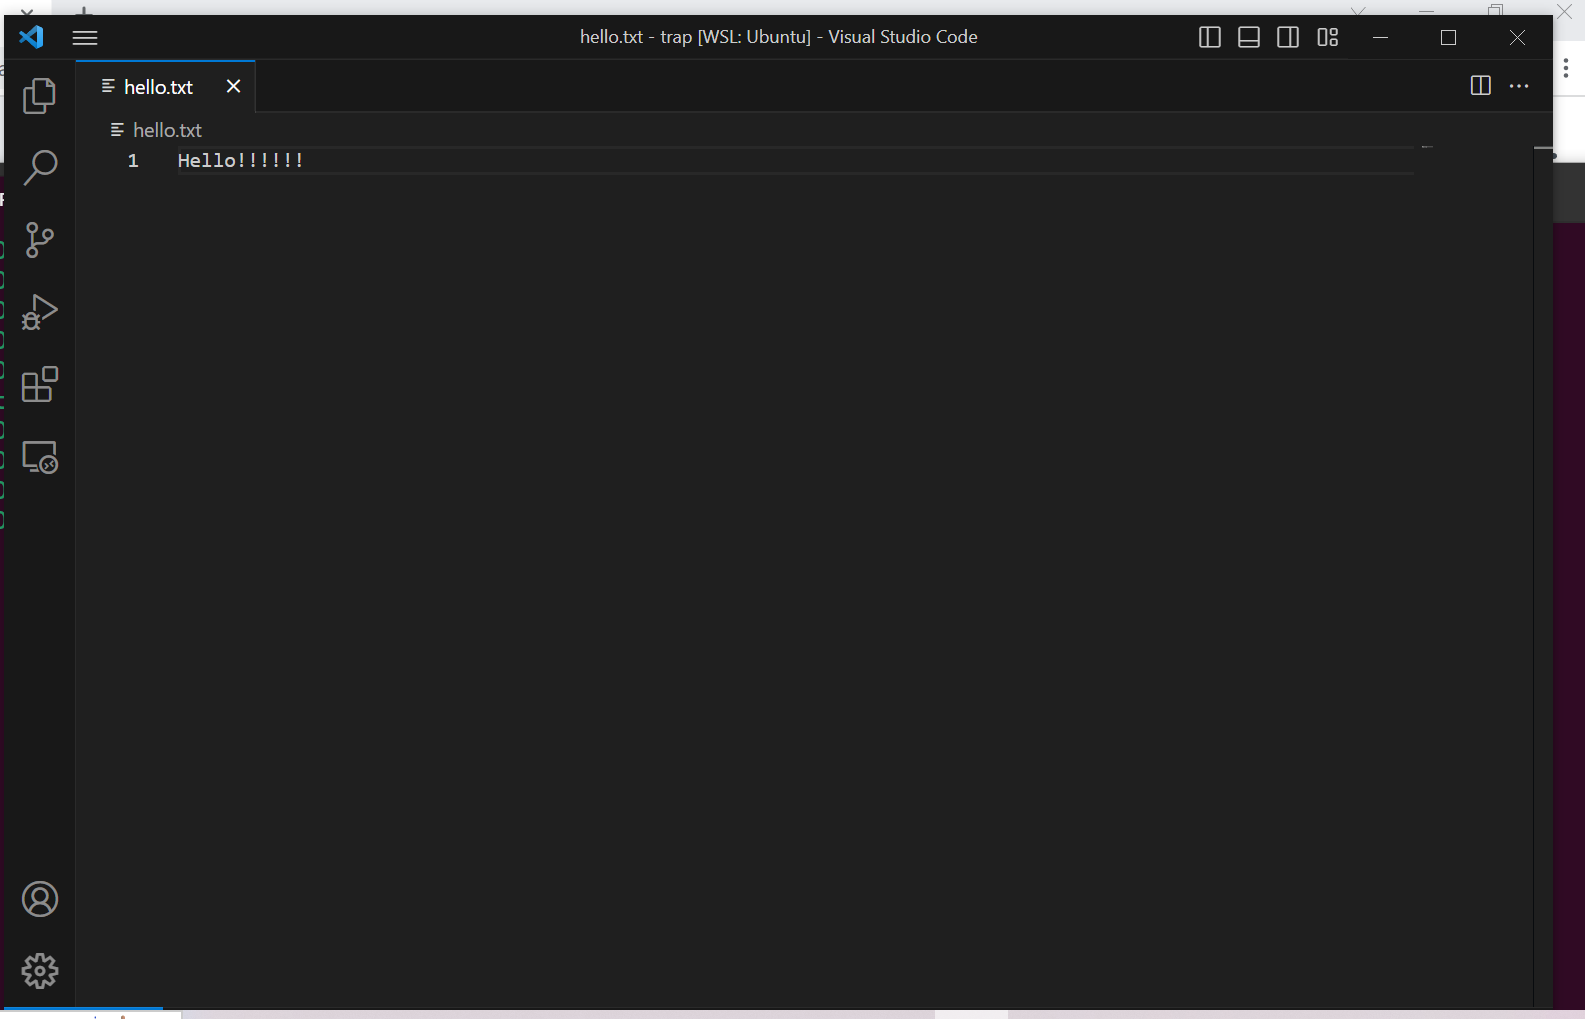 | ||
|
|
||
| ::: tip | ||
| VSCode が起動しない場合は、一度ターミナルを閉じて開きなおしてからコマンドを再度実行してみてください。 | ||
| ::: | ||
|
|
||
| 8. traQ の tasks チャンネルで :vscode: スタンプを押す | ||
|
|
||
| ## Step 4: 拡張機能の設定 | ||
|
|
||
| 1. VSCodeの 画面で `Ctrl` + `Shift` + `X` | ||
|
|
||
| 2. 「C++」と入力し、「C/C++ Extension Pack」の拡張機能を追加 | ||
|
|
||
| 3. `Code Runner` と入力して、「Code Runner」拡張機能を追加 | ||
|
|
||
| 4. `Ctrl` + `,` で設定を開く。下記画像の赤丸で囲んだ部分を押して `settings.json` を開く。 | ||
|  | ||
|
|
||
| 5. もし`"cpp": `で始まる行がなければ、一番最後の行の1つ前の行( `}` の前!)に次のコードを追加する。その前の行に `,` がなかったら追加する。 | ||
|
|
||
| ``` | ||
| "code-runner.executorMap": { | ||
| "cpp": "cd $dir && clang++ -std=c++17 $fileName -o $fileNameWithoutExt && $dir$fileNameWithoutExt", | ||
| }, | ||
| ``` | ||
|
|
||
|  | ||
|
|
||
| ::: tip | ||
|
|
||
| もしすでに`"cpp": ` で始まる行があった場合、以下のように`g++` を `clang++` に置き換える。 | ||
|
|
||
| ```diff | ||
| - "cpp": "cd $dir && g++ $fileName -o $fileNameWithoutExt && $dir$fileNameWithoutExt", | ||
| + "cpp": "cd $dir && clang++ -std=c++17 $fileName -o $fileNameWithoutExt && $dir$fileNameWithoutExt", | ||
| ``` | ||
|
|
||
| ::: | ||
|
|
||
| 6. `"code-runner.executorMap": {` の行の前に `"code-runner.runInTerminal": true,` を書く(コピペ推奨!!) | ||
|
|
||
| 6. 編集画面に赤い波線が出ていないことを確認する。出ている場合は入力にミスがある可能性が高いので、もう一度確認してみる。 (それでも解決しない場合はTAを呼んでください) | ||
|
|
||
| 7. こんな感じになっていれば OK | ||
|  | ||
|
|
||
| 8. WSL を開き、 `code main.cpp` と入力する | ||
|
|
||
| 9. 次のように書く(コピペでも OK ) | ||
|
|
||
| ```cpp | ||
| #include <iostream> | ||
| using namespace std; | ||
|
|
||
| int main() { | ||
| cout << "Hello, World!" << endl; | ||
| } | ||
| ``` | ||
|
|
||
| 10. 画像の赤丸で実行してみる。下側の画面に `Hello, World!` が出れば成功! | ||
|  | ||
|
|
||
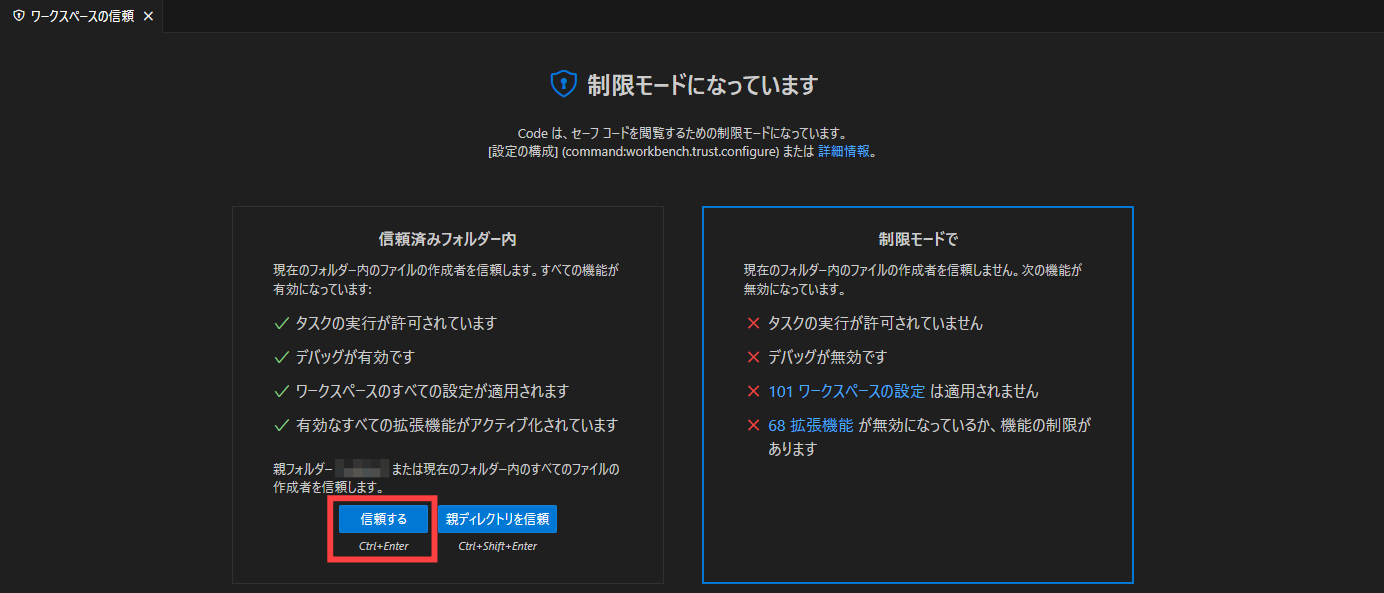
| ::: tip | ||
| 三角のボタンが表示されない場合、ウィンドウの左下に「制限モード」と表示されていないか確認してみてください。 | ||
|
|
||
| 表示されている場合にはそこをクリックして、その先の画面で「信頼する」をクリックしてください。 | ||
| (画像の赤枠部分) | ||
|
|
||
|  | ||
| ::: | ||
|
|
||
| ::: tip | ||
| ボタンを押してもうまくいかない場合は、代わりに三角の隣の `v` を押して、「Run Code」を押してみてください! | ||
|
|
||
|  | ||
| ::: | ||
|
|
||
| 11. traQ の tasks チャンネルで :done: スタンプを押す | ||
|
|
||
| 12. 環境構築はこれで完了です!お疲れ様でした。 :blob_pyon: |
This file contains hidden or bidirectional Unicode text that may be interpreted or compiled differently than what appears below. To review, open the file in an editor that reveals hidden Unicode characters.
Learn more about bidirectional Unicode characters
| Original file line number | Diff line number | Diff line change |
|---|---|---|
| @@ -1 +1,18 @@ | ||
| # 1. 環境構築 | ||
|
|
||
| プログラミングとは、という話をする前にまず**環境構築**を行っていきます。これにかなり時間がかかると考えられるので、環境構築を済ませてから講習を進めていきます。 | ||
|
|
||
| :::tip | ||
| プログラミングをする為の**環境**を**構築**する → **環境構築** | ||
| ::: | ||
|
|
||
| 基本的に各自で資料を読みながら、進めてください。 | ||
|
|
||
| **もし手が止まった・わからない所があったらすぐに手を上げるか何かしてTAを呼んでください。** | ||
| **終わったら隣の人の様子を見てみてください。** | ||
|
|
||
| 使用しているパソコンの種類によって、環境構築の手順が異なります。自分のパソコンに対応するページに進み、環境構築をしていきましょう。 | ||
|
|
||
| [**Mac** の環境構築手順](/cpp/chapter-1/1-A) | ||
|
|
||
| [**Windows** の環境構築手順](/cpp/chapter-1/1-B) |
Oops, something went wrong.
Add this suggestion to a batch that can be applied as a single commit.
This suggestion is invalid because no changes were made to the code.
Suggestions cannot be applied while the pull request is closed.
Suggestions cannot be applied while viewing a subset of changes.
Only one suggestion per line can be applied in a batch.
Add this suggestion to a batch that can be applied as a single commit.
Applying suggestions on deleted lines is not supported.
You must change the existing code in this line in order to create a valid suggestion.
Outdated suggestions cannot be applied.
This suggestion has been applied or marked resolved.
Suggestions cannot be applied from pending reviews.
Suggestions cannot be applied on multi-line comments.
Suggestions cannot be applied while the pull request is queued to merge.
Suggestion cannot be applied right now. Please check back later.
There was a problem hiding this comment.
Choose a reason for hiding this comment
The reason will be displayed to describe this comment to others. Learn more.
/cpp/preface/1のページタイトルは「講習会ガイダンス」ですが、サイドバー表示が「この講習会について」のままになっています。ナビ上の表記とページ内容がずれるので、サイドバーの text をページタイトルに合わせるなどして整合性を取ってください。