Cloned from Ben Almans dotfiles project. This fork focuses on my personal setup.
My OSX / Ubuntu dotfiles.
I've been using bash on-and-off for a long time (since Slackware Linux was distributed on 1.44MB floppy disks). In all that time, every time I've set up a new Linux or OS X machine, I've copied over my .bashrc file and my ~/bin folder to each machine manually. And I've never done a very good job of actually maintaining these files. It's been a total mess.
I finally decided that I wanted to be able to execute a single command to "bootstrap" a new system to pull down all of my dotfiles and configs, as well as install all the tools I commonly use. In addition, I wanted to be able to re-execute that command at any time to synchronize anything that might have changed. Finally, I wanted to make it easy to re-integrate changes back in, so that other machines could be updated.
That command is dotfiles, and this is my "dotfiles" Git repo.
When dotfiles is run for the first time, it does a few things:
- In Ubuntu, Git is installed if necessary via APT (it's already there in OSX).
- This repo is cloned into your user directory, under
~/src/dotfiles. - Files in
/copyare copied into~/. (read more) - Directories in
/link-dirare symlinked into~/. (read more) - Files in
/link-fileare symlinked into~/. The entirelink-dir/.configtree is symlinked into~/.config. (read more) - You are prompted to choose scripts in
/initto be executed. The installer attempts to only select relevant scripts, based on the detected OS and the script filename. - Your chosen init scripts are executed (in alphanumeric order, hence the funky names). (read more)
On subsequent runs, step 1 is skipped, step 2 just updates the already-existing repo, and step 5 remembers what you selected the last time. The other steps are the same.
- The
/backupsdirectory gets created when necessary. Any files in~/that would have been overwritten by files in/copyor/linkget backed up there. - The
/bindirectory contains executable shell scripts (including the dotfiles script) and symlinks to executable shell scripts. This directory is added to the path. - The
/cachesdirectory contains cached files, used by some scripts or functions. - The
/confdirectory just exists. If a config file doesn't need to go in~/, reference it from the/confdirectory. - The
/sourcedirectory contains files that are sourced whenever a new shell is opened (in alphanumeric order, hence the funky names). - The
/testdirectory contains unit tests for especially complicated bash functions. - The
/vendordirectory contains third-party libraries.
Any file in the /copy subdirectory will be copied into ~/. Any file that needs to be modified with personal information (like copy/.gitconfig which contains an email address and private key) should be copied into ~/. Because the file you'll be editing is no longer in ~/src/dotfiles, it's less likely to be accidentally committed into your public dotfiles repo.
Any directory in the /link-dir subdirectory gets symlinked into ~/ with ln -s. Edit one or the other, and you change the directory in both places.
Any file in the /link-file subdirectory gets symlinked into ~/ without replacing its parent directory. Top-level files like link-file/.zshrc link directly to ~/.zshrc. Nested files like link-file/.continue/config.yaml link only ~/.continue/config.yaml, leaving ~/.continue/logs, ~/.continue/sessions, and other runtime data alone.
Scripts in the /init subdirectory will be executed. A whole bunch of things will be installed, but only if they aren't already.
- Minor XCode init via the init/10_osx_xcode.sh script
- Homebrew via the init/20_osx_homebrew.sh script
- Homebrew recipes via the init/30_osx_homebrew_recipes.sh script
- Homebrew casks via the init/30_osx_homebrew_casks.sh script
- Fonts via the init/50_osx_fonts.sh script
- Node.js, npm and nave via the init/50_node.sh script
- Ruby, gems and rbenv via the init/50_ruby.sh script
- Vim plugins via the init/50_vim.sh script
Because the dotfiles script is completely self-contained, you should be able to delete everything else from your dotfiles repo fork, and it will still work. The only thing it really cares about are the /copy, /link-dir, /link-file and /init subdirectories, which will be ignored if they are empty or don't exist.
If you modify things and notice a bug or an improvement, file an issue or a pull request and let me know.
Also, before installing, be sure to read my gently-worded note.
You need to have XCode or, at the very minimum, the XCode Command Line Tools, which are available as a much smaller download.
The easiest way to install the XCode Command Line Tools in OSX 10.9+ is to open up a terminal, type xcode-select --install and follow the prompts.
Tested in OSX 26.4
If you're not me, please do not install dotfiles directly from this repo!
Why? Because I often completely break this repo while updating. Which means that if I do that and you run the dotfiles command, your home directory will burst into flames, and you'll have to go buy a new computer. No, not really, but it will be very messy.
- Read my gently-worded note
- Fork this repo
- Open a terminal/shell and do this (change
jesperronnandmainas appropriate):
export DOTFILES_GH_USER=jesperronn
export DOTFILES_GH_BRANCH=main
bash -c "$(wget -qO- https://raw.github.com/$DOTFILES_GH_USER/dotfiles/$DOTFILES_GH_BRANCH/bin/dotfiles)" && source ~/.bashrc
Since you'll be using the dotfiles command on subsequent runs, you'll only have to set the DOTFILES_GH_USER variable for the initial install, but if you have a custom branch, you will need to export DOTFILES_GH_BRANCH for subsequent runs.
There's a lot of stuff that requires admin access via sudo, so be warned that you might need to enter your password here or there.
bash -c "$(curl -fsSL https://raw.githubusercontent.com/jesperronn/cowboy-dotfiles/main/bin/dotfiles)" && source ~/.bashrcTo keep things easy, the ~/.bashrc and ~/.bash_profile files are extremely simple, and should never need to be modified. Instead, add your aliases, functions, settings, etc into one of the files in the source subdirectory, or add a new file. They're all automatically sourced when a new shell is opened. Take a look, I have a lot of aliases and functions. I even have a fancy prompt that shows the current directory, time and current git/svn repo status.
If you want to manage a nested home file without symlinking its whole parent directory, put it under link-file/. For example, link-file/.continue/config.yaml links only ~/.continue/config.yaml, leaving ~/.continue/logs, ~/.continue/sessions, and other runtime data alone.
The entire ~/.config tree is symlinked from link-dir/.config.
If you already have a file or folder in place and want to bring it under repo management, use rehome /path/to/item. It moves the target into link-file/ or link-dir/ inside the selected repo and leaves a symlink behind at the original location. Use REHOME_DEFAULT_FILE_DEST and REHOME_DEFAULT_FOLDER_DEST to change the default destinations.
In addition to the aforementioned dotfiles script, there are a few other bin scripts. This includes nave, which is a git submodule.
- dotfiles - (re)initialize dotfiles. It might ask for your password (for
sudo). Use--copy,--link, or--initto run a single phase. rehome- move an existing file or folder intolink-file/orlink-dir/and symlink it back. Use--repo-root /path/to/repoto target another repo, andREHOME_DEFAULT_FILE_DEST/REHOME_DEFAULT_FOLDER_DESTto override the default destinations.- src - (re)source all files in
/sourcedirectory bin/lint- lint shell scripts withbash -nandshellcheck, including--format offenses,--format worst, and--autocorrectsupport for ShellCheck diff patches.- Look through the bin subdirectory for a few more.
See docs/ai-tooling.md for the Ollama persistence setup, the shared Modelfile aliases in ~/.ollama/modelfiles, and how that fits with VS Code extensions such as Copilot Chat and local Ollama clients.
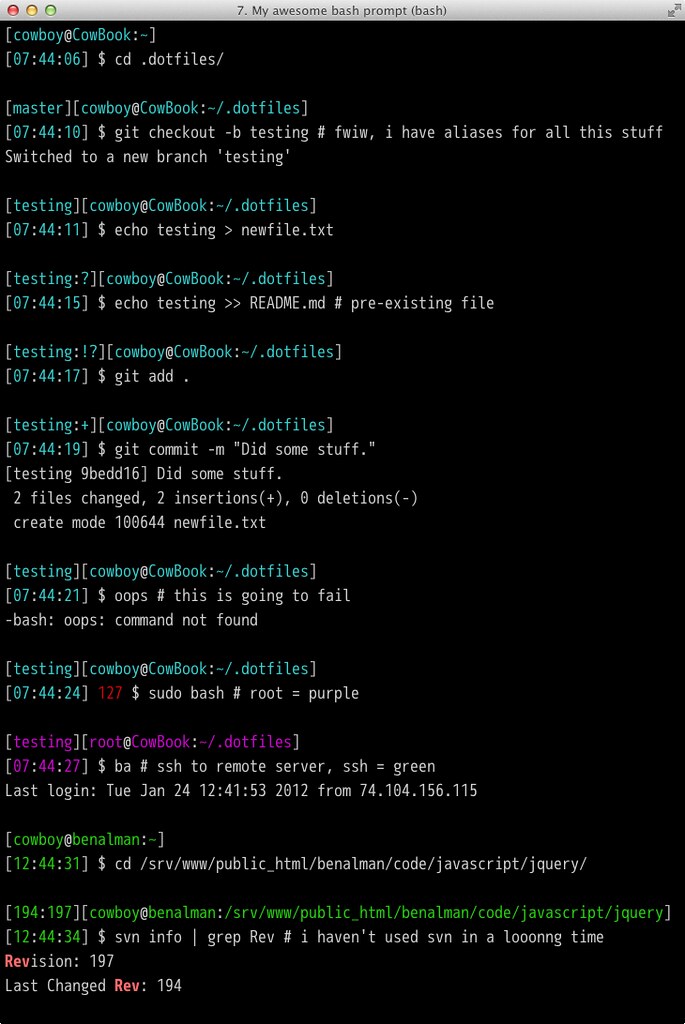
I think my bash prompt is awesome. It shows git and svn repo status, a timestamp, error exit codes, and even changes color depending on how you've logged in.
Git repos display as [branch:flags] where flags are:
? untracked files ! changed (but unstaged) files + staged files
SVN repos display as [rev1:rev2] where rev1 and rev2 are:
rev1 last changed revision rev2 revision
Check it out:
https://github.com/gf3/dotfiles https://github.com/mathiasbynens/dotfiles (and 15+ years of accumulated crap)
Copyright (c) 2014 "Cowboy" Ben Alman Licensed under the MIT license. http://benalman.com/about/license/