You will need a Linux or Windows server that supports the following before continuing:
- PHP v7.2+'
- Database (MySQL, SQL Server, or PostgreSQL)
- Composer
- NodeJS v14
- NPM v7
-
Clone the Git repository into a directory.
git clone https://github.com/little-apps/WetBatTravel.git cd WetBatTravel -
Create a file called
.envin theWetBatTraveldirectory. -
Copy and paste the following into the
.envfile. Replace eachxxxwith an appropriate value.APP_NAME="Wet Bat Travel" APP_ENV=local APP_KEY= APP_DEBUG=false APP_URL=http://xxx LOG_CHANNEL=stack LOG_LEVEL=debug DB_CONNECTION=mysql DB_HOST=xxx DB_PORT=3306 DB_DATABASE=xxx DB_USERNAME=xxx DB_PASSWORD=xxx -
Install the needed Composer packages:
composer require -
Generate a key for the app and JWT:
php artisan key:generate php artisan jwt:secret -
Install the needed NPM packages:
npm install -
Compile the Sass and TypeScript files:
npm run production -
Serve the application using PHP:
php artisan serve --host=localhost --port=8080 -
Access the app in a web browser by going to http://localhost:8080
You will need the following before continuing:
-
Clone the Git repository into a directory.
git clone https://github.com/little-apps/WetBatTravel.git cd WetBatTravel -
Create app on Heroku:
heroku create -
Push the source code to Heroku:
git push heroku -
Set the
APP_KEYenvironment variable:heroku run php artisan key:generate --show heroku config:set APP_KEY="(Output from above command)" -
Set the
APP_URLenvironment variable to the URL of your Heroku app:heroku config:set APP_URL="https://xxxx.herokuapp.com/" -
Add the NodeJS build pack to the Heroku app:
heroku buildpacks:add heroku/nodejs -
Set the database environment variables by:
a) Replacing
xxxwith the approriate value and running each command:heroku config:set DB_CONNECTION=xxx heroku config:set DB_HOST=xxx heroku config:set DB_PORT=xxx heroku config:set DB_DATABASE=xxx heroku config:set DB_USERNAME=xxx heroku config:set DB_PASSWORD=xxxb) You can also spin up a ClearDB MySQL server by going to the Resources tab for the Heroku app and simply set the DATABASE_URL to the same value as
CLEARDB_DATABASE_URL.
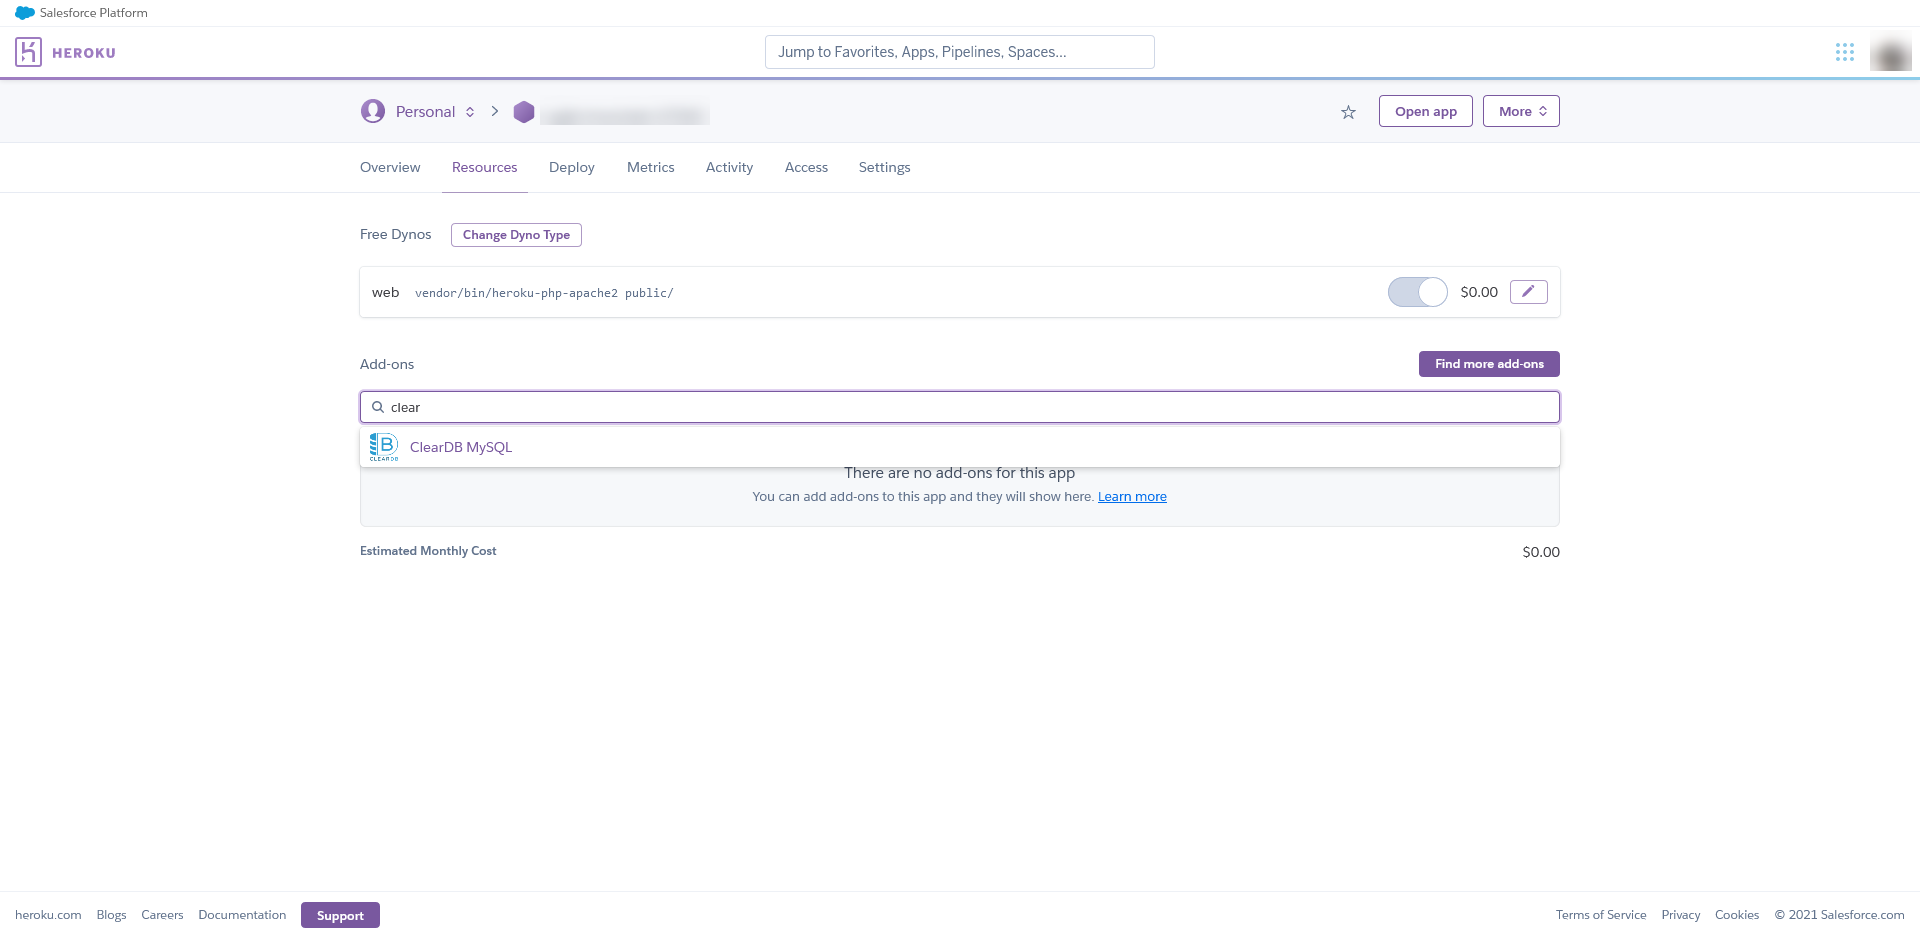
    heroku config:get CLEARDB_DATABASE_URL
    heroku config:set DATABASE_URL="(Output from above command)"
-
Trigger the Heroku app to be re-deployed and re-compile assets:
git commit --allow-empty -m "Trigger Heroku deploy" git push heroku -
Migrate the database so the structure is correct and the tables are seeded. First, you will need to install the needed Composer packages using Bash.
heroku run bash $ composer install $ php artisan migrate:fresh --seed -
Access the app by going to the Heroku URL in your web browser.
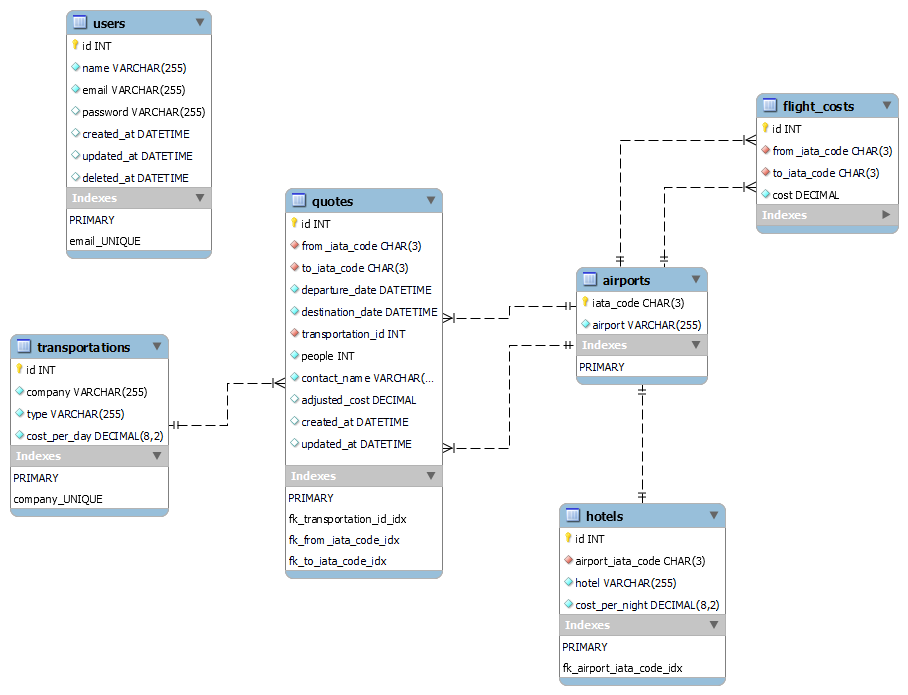
- I put together the ERD using MySQL Workbench and this makes it easier to convert to Laravel's database migrations.
- I used Bootstrap Studio to put together a template for the dashboard.
- I created the app using the starter template for Laravel and set it up to work with TypeScript and React.
- I moved the ERD into Laravel's database migrations, as well as generated models and seeders for each table.
- I converted the Bootstrap template into React components (using Reactstrap). I also setup the view so it renders the React components.
- I created controllers so the backend can be accessed using an API.
- I modified the React components so they work with the API.
- I fixed up the UI and added charts as well as icons.
Between the backend and frontend, I would say I put an equal amount of work into both. However, I did put a reasonable amount of work into the frontend so it matches up with the prototype.
- I changed some of the form control types so they're more appropriate (ie: a dropdown instead of a textbox for airports and transportation).
- I included a spinning circle so the user knows it's loading from the API.
- Since the table of quotes is being shown in the dashboard and quotes page, I created that as a seperate component.
- I had to fix up the database structure a bit so it's able to reference related models.
- The quote is calculated using the price of the related items and the table also has "adjusted_cost" so it stores the price in case a related item's cost changes.
- I was going to have the quotes link to specific people (as a m:n relationship) and also the contact person, but this would've taken more time. Instead, I just used a column called "people" that stores the number of people and another column called "contact_name" which stores the persons name as a VARCHAR.
- MVC Framework
- Supports different databases using ORM and migrations.
- Built-in support for translating TypeScript to ES5 (similiar to Webpack)
- Simple to write REST APIs
- Many third-party libraries and plugins available.
- Good for small-scale websites.
- Uses Git to sync so website is updated automatically.
- Client's requirement.
- Supported by Laravel.
- TypeScript enforces the data types so you're not pulling variables from nowhere.
- Scales well (components can be re-used, APIs can be updated as needed)
- Works with modern web browsers.
The following is the ERD for the database:
- Quick quote
- View quotes
- View a quote
- Authentication