A 3-ring NeoPixel wall clock on the Seeed XIAO ESP32-C3. Seconds sweep the outer 60-LED ring, minutes on the 24, hours on the 12. Web UI, NTP sync, OTA updates, ambient-light auto dimming, and Focus Reminder nudges for when you lose track of time. The diffused rings bloom like a flower, hence the name.

I went downstairs to print a coloring page. On the way I found a project that needed me. An hour later I came back up empty-handed and got: Dad, I thought you were printing me a coloring page.
That's the tendency this clock is built around. I hyperfocus, and alarms don't fix it. One lands mid-thought, I swipe it away, and I've already forgotten it. A change of light in the room does work. So I put it in the thing I already look at.
The clock doesn't nag and there's nothing to dismiss. Every so often the light does something slow and obvious at the edge of your vision, and you get to decide what happens next. An alarm demands. A nudge asks. It helps that it's pretty, and that it's already on the wall doing a job, so I never resent it going off.
ChronoBloom is a clock built by a dad to keep time, and to keep life above the project at hand. Look up. Shift gears. Tend to what matters.
The feature is called Focus Reminders and it's in docs/FOCUS_REMINDERS.md. Everything else on this clock got built around it.
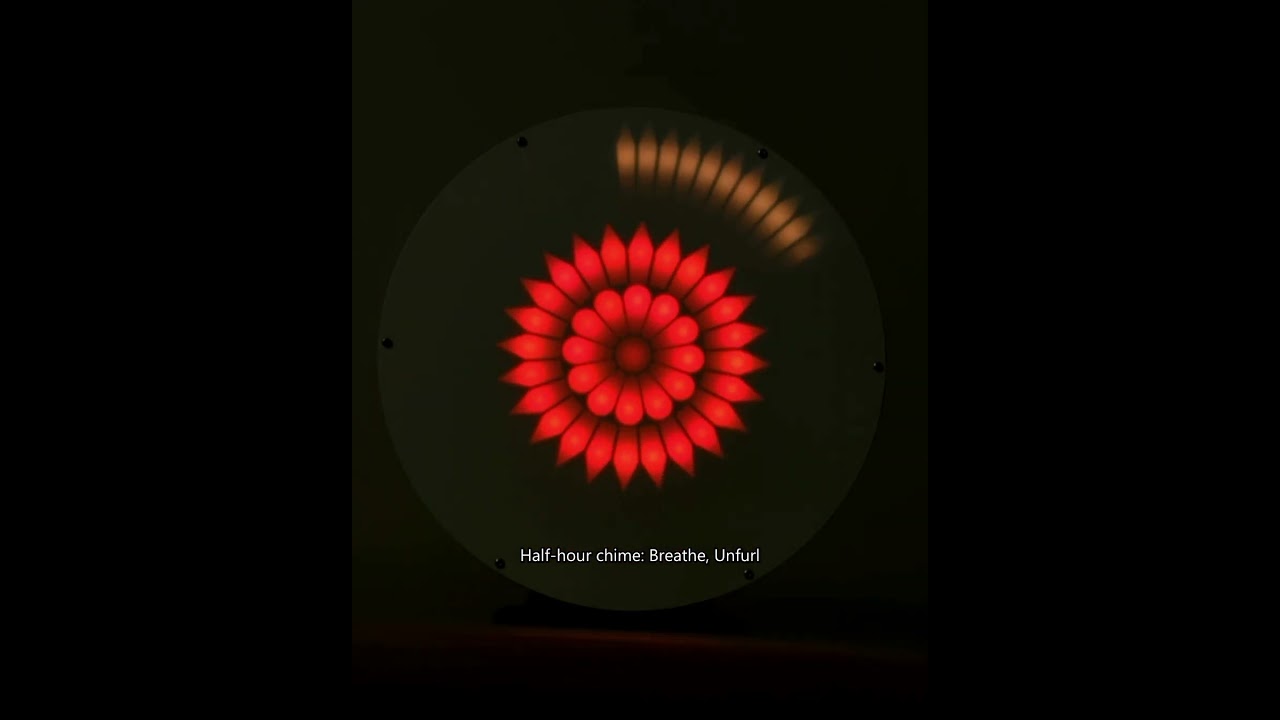
They don't do it justice, and I don't think a camera can. These are bright, narrow-band addressable LEDs behind a diffuser. Your eye adapts locally, so a deep saturated red sitting right next to a pale gold reads correctly, both at once. A sensor can't do that. It clips whichever channel is brightest, fights the white balance, and blooms the highlights, so the saturated hues come back either washed out or blown to white.
Getting even these shots took far more takes than it should have (ISO 10, 1/50, dark room) for quality I'd call barely acceptable. So treat them as a hint, not a record. In other words it looks better in person, and that's the one thing here I can't show you.
- Time from NTP over WiFi, with timezone and DST rules. No RTC chip.
- Web UI on your LAN for colors, brightness, animations, and per-ring settings
- Seven face themes, six named for real blooming flowers (Moonflower, Cherry Blossom, Ember Dahlia, Lotus Pond, Sunflower, Bird of Paradise) and built from that flower's own colors
- Eleven curated contrast presets, plus nine colors you can set one ring element at a time
- Animation palettes are radial: petals on the outer ring, throat on the inner, stamen at the center, color ramping rim to core so a chime or a nudge reads as the clock blooming
- Quarter-hour, half-hour, and top-of-hour chime animations (3/3/5 styles)
- A light sensor drives auto-brightness. Pitch black room, LEDs sleep. Light returns, clock wakes.
- Focus Reminders: visual nudge animations at intervals you pick, built for interrupting hyperfocus. A peripheral ask, not an alarm.
- WiFi setup in the browser at flash time, or via captive portal on first boot. No hardcoding credentials.
- OTA firmware updates from a browser after the first USB flash
- Settings persist in EEPROM, with a user-saved defaults slot
WLED is a brilliant effects engine with a huge ecosystem, and it beats this project on effect count and community by a mile, but a ring clock like this one is a usermod you compile yourself. Clockwise is a browser-flashable 64x64 matrix clock, and nothing here touches its pixel-art faces. ChronoBloom is clock-first for this three-ring shape: per-ring hands, chimes, focus nudges, a per-frame power budget, lux sleep, and its own browser flasher. If you want an LED playground, run WLED. If you want this clock, this is its firmware.
Prices swing. Shop around.
| Part | Qty | Notes | Where |
|---|---|---|---|
| Seeed XIAO ESP32-C3 | 1 | The brain. USB-C, WiFi, tiny. About $10 for one, cheaper per board in a 3-pack. | Amazon, single / Amazon, 3-pack |
| WS2812B 241-LED ring set | 1 | Sold as a 9-ring kit (WESIRI), about $26. You use the 60, 24, and 12 rings plus 1 loose pixel for the center. Rest goes in the parts bin. Rings come pre-assembled with 3-wire JST leads. | Amazon |
| VEML7700 lux sensor module | 1 | Optional but worth it. Auto-brightness and dark-room sleep. Usually sold as a 2-pack. | Amazon |
| Momentary push buttons | 2 | Time up/down, factory reset combo. Prewired 7mm ones save you a soldering job. | Amazon |
| USB-C phone charger, 2A | 1 | The clock has a USB-C socket on the back. Any phone charger does it. I run mine on 2A. You almost certainly own one already. | Whatever is in your drawer |
| 300 ohm resistor | 1, optional | Inline on the LED data line. Good practice, and it costs nothing if you have one. Mine run fine without it, so do not let a missing resistor stop you building. | Parts bin, or any resistor kit |
| M2.5 fine thread bolts | 8 | The only fastener in the build. They pass through the front three parts and the back cover, and thread into the ring. Fine thread, not coarse. Coarse will strip a printed hole. An assorted box is cheaper than buying one size. | Amazon |
Why 2A is enough. All 97 LEDs at full white would want about 5.8A, which sags the rail and browns the board out. The firmware never lets that happen: before every frame it adds up what the pixels are about to draw and, if it would cross the budget, dims that one frame to fit. The ceiling is set to 1800mA, sized for a 5V 2A supply. Normal frames pass through untouched.
Some links above are Amazon affiliate links. As an Amazon Associate I earn from qualifying purchases. It costs you nothing extra and it doesn't change which parts I recommend. Buy them anywhere you like, the build doesn't care.
Plus a 3D printer, a spool of basic PLA, a bit of white PLA for the front diffuser, some wire, and hot glue or cable ties.
Six steps from a box of parts to a running clock. Each one has a check. If a check fails, jump to the matching row in If it doesn't work.
What you need to be able to do: print, and ideally solder a little. Flashing needs no toolchain, it's a web page.
The rings arrive pre-assembled with 3-wire JST connectors, so nothing here is fine-pitch or fiddly. Soldering the chain is about getting a joint that stays put in a clock hanging on a wall for years, not about making the connection possible in the first place. If you buy the XIAO with pins presoldered, and use the prewired buttons from the BOM, you can get most of the way with a scrap of protoboard and Dupont jumpers. You can force Dupont pins into the JST housings too, but they are the wrong size for it and it will let you down eventually, so solder the ring chain if you can.
- Print the parts. Print the 8" set (below): the frame ring, the reflector that sits behind the LEDs and shapes the light into pointed hands, the front diffuser that softens them into a bloom, the spacer that sets the depth and keeps light from bleeding between rings, the back cover and the stand. The reflector and the diffuser do opposite jobs, so do not swap them, and the spacer is not optional. Settings and the front-diffuser rules are in docs/PRINTING.md. Basic PLA for everything except the front diffuser, which has to be white. Check: parts release cleanly from the bed, and the three ring seats hold the 60, 24, and 12 LED rings without forcing.
- Wire it. Follow Wiring. Ring data leaves GPIO10, ideally through the 300 ohm resistor, the rings feed from the XIAO's 5V pin, and the sensor takes 3V3. Check: meter on continuity across 5V and GND before you plug anything in. No beep means no short.
- Flash the firmware. Easiest is the browser flasher at maestro8484.github.io/ChronoBloom/flasher. Building from source works too, see Flash it. Check: within a few seconds the rings glow blue, or the browser offers to set up WiFi. Blue means the firmware is alive.
- Get it on WiFi. Use the browser WiFi setup if it appears, or join the
esp32c3-clock-setupnetwork and pick yours. See WiFi setup. Check:http://esp32c3-v3-8inch.local/opens the web UI. - Set your time zone. In the web UI, Time & light, Time zone. Pick a zone or paste your own. Check: the clock shows your correct local time within a few seconds. No reboot needed.
- Fit the front diffuser and close it up. The thin printed white PLA sheet sits over the rings. Check: the light blooms soft and even, with no single LED points poking through.
The recommended path, and the one the files here are tuned for. The scale is what it is: sized so the rings from the 241-LED kit seat precisely, not to suit any particular printer. Largest part is 209 mm square, which fits a 220 mm bed (Ender 3 class) and sits comfortably on a 256 mm one. Single NeoPixel chain of 97 LEDs: the three rings, then the center pixel. A thin white PLA front diffuser over the face. A desk kickstand ships with the files; there's no wall-mount feature in the 8" parts, so hanging it is on you. Weighs about 500g.
Build environment: esp32c3_v3_8inch
198% scale, which is where the outer ring's LED spacing lands right. Frame prints in thirds with alignment pins. The front diffuser needs one of:
- Laser-cut acrylic (600mm x 410mm bed) with parchment paper behind it
- 0.5mm white PLA face printed on an XXL-bed printer
Separate center pixel strip on GPIO20. This is the wall piece. Build the 8" first, then decide if you want to go big.
Build environment: esp32c3_v3_15inch
Current 8" set: docs/publish/ChronoBloom_3D_Files/ChronoBloom_8inch/V13/. Six printable parts plus an assembly 3MF with the print profiles already set, a second 3MF showing the stack in assembly order, and SVGs of the flat parts for anyone cutting rather than printing. 15" set: ChronoBloom_15inch/. Print settings and the front-diffuser rules are in docs/PRINTING.md. CC BY 4.0, credit Steve Manley (see NOTICE).
Two of those parts do opposite jobs and the names matter. The reflector sits behind the LEDs and shapes the light into pointed hands, and that's the part remixed from Steve Manley's design. The front diffuser is a separate thin white sheet over the face that softens the pixels into a bloom. That one's mine, and it's the fussy one to print.
The spacer is the third one people skip, and it earns its place twice. Its raised rings stand exactly as tall as the WS2812B rings sit once they're seated in the reflector, so the stack closes at the right height, and those same rings sit between the 60, the 24 and the 12 as walls so one ring's light doesn't wash into the next. Flat side faces away from the front of the clock.
Holding it together. M2.5 fine thread bolts, and nothing else. No glue, no pins, no inserts. The ring is the spine: it's 21 mm thick and everything threads into it. One bolt runs from the front through all three front parts, the diffuser, the reflector and the spacer, and bites into the ring. The back cover bolts into that same ring from behind. The pass-through holes are 2.9 mm so the bolt slides, and the ring's own holes are 2.6 mm so the thread cuts in and holds.
Use fine thread. Coarse M2.5 strips a printed hole on the first turn. If your printer runs tight and a bolt won't start, open the ring holes with a 2.6 mm bit rather than forcing it, and leave the 2.9 mm holes alone.
The LED rings drop straight into the recessed seats in the printed core, no forcing, no rework. Measured with calipers, the rings are 172 mm across the outer 60, 92 mm across the middle 24 and 52 mm across the inner 12, with a 6 mm opening in the middle for the single center LED. Any WS2812B rings at those diameters will seat.
XIAO Pin    GPIO    Function                Notes
─────────────────────────────────────────────────────────────
D10         GPIO10  NeoPixel data (rings)   Through 300 ohm resistor (optional)
D7          GPIO20  NeoPixel data (center)  15" build only
D3          GPIO5   Button UP               INPUT_PULLUP, polled
D9          GPIO9   Button DOWN             INPUT_PULLUP, polled
D4          GPIO6   I2C SDA                 VEML7700
D5          GPIO7   I2C SCL                 VEML7700
5V/VIN      -       LED power rail          Fed from XIAO 5V pin (USB-C VBUS); one charger powers everything
GND         -       Common ground           Board and LED rings
3V3         -       VEML7700 power only     Do NOT power LEDs
─────────────────────────────────────────────────────────────
AVOID: GPIO2, GPIO8 (boot strapping); GPIO3/GPIO4 (JTAG)
Don't hold the DOWN button (GPIO9) at power-on. It's the ESP32-C3 boot pin.
One data line runs through everything, biggest ring first, each ring's DOUT into the next one's DIN:
GPIO10 --[300 ohm]--> DIN [ 60-ring ] DOUT --> DIN [ 24-ring ] DOUT --> DIN [ 12-ring ] DOUT --> center pixel
                          seconds and                24h hand                12h hand              status
                          minutes
That's 97 LEDs on one wire, and the firmware counts them in exactly that order: the center is the last pixel in the chain. Get the order wrong and the clock lights up but the face is scrambled, because every index lands on the wrong ring.
The rings all run the same way, outer to inner, most LEDs to fewest. Watch the DIN and DOUT markings on each ring rather than guessing from the physical layout.
They come pre-assembled with 3-wire JST leads, one set in and one set out: 5V, ground and data. That makes the direction easy to read, and it means you can dry-fit the whole chain and power it up to check the order before committing to solder.
The center pixel can be its own wire instead. The 15" build already does this, on GPIO20, and the firmware supports it as a build option. Worth doing if you'd rather drive the center from something else, since it is only the status indicator: it shows WiFi and board state, and the web UI can set it to a bloom pulse, status only, off, or a temperature readout if you ever add a sensor for it.
Full pin maps, LED indexing, power math, and assembly notes: docs/HARDWARE.md
Easiest way: maestro8484.github.io/ChronoBloom/flasher. Chrome or Edge on a desktop, plug the board in over USB-C, click the button. No install.
If you'd rather build from source, that path stays fully open too. Needs PlatformIO (VS Code extension or CLI).
git clone https://github.com/Maestro8484/ChronoBloom.git
cd ChronoBloom
The 8" is what pio run builds by default. Pass -e esp32c3_v3_15inch if you want the 15".
First flash over USB:
pio run -e esp32c3_v3_8inch -t upload --upload-protocol esptool --upload-port COMx
Swap COMx for your port (/dev/ttyACM0 on Linux). Serial monitor runs at 115200.
Every flash after that is OTA from a browser:
- Build:
pio run -e esp32c3_v3_8inch - Open
http://esp32c3-v3-8inch.local/update - Upload
.pio/build/esp32c3_v3_8inch/firmware.bin
Inner ring shows blue during update, green on success, red on failure. Device reboots itself.
No credentials in code. On first boot the clock listens over the same USB cable for a browser-based WiFi setup (the flasher page above may offer this right after flashing). Type your network name and password there and you're done.
If that doesn't show up, or you skip it, the clock opens its own captive portal instead:
- Join the WiFi network
esp32c3-clock-setupfrom your phone (no password) - A setup page opens (or go to
http://192.168.4.1) - Pick your network, enter the password
- Clock saves it and connects. It remembers across power cuts
After that it auto-connects on boot. If the password changes or the network disappears, the portal comes back.
Then open the web UI: http://esp32c3-v3-8inch.local/ (or the IP from your router's device list).
Everything is set from here. No app, no account, no cloud. It is one page served off the clock itself, so it works on a phone or a laptop on the same network.

Quick controls sit at the top for the things you change often. The four sections below them hold the rest: motion and nudges, colors and rings, time and light, and system tools like firmware updates and settings backup.
There's a full tour of it on video, about three and a half minutes, every setting: ChronoBloom web UI walkthrough.
One thing to know before you hang it up. There's no password on any of this. Anyone who can reach the clock on your network can open the page, change every setting, read which network it's joined to, and push new firmware to it. That's a deliberate trade for a thing that lives on your wall and gets set up once, and it's the same trade most LAN gadgets make, but it does mean this belongs on your home network and not on the open internet. Don't port-forward it.
If an update ever leaves it unable to boot, there's no automatic rollback. Plug it into USB and flash it again with the browser flasher, which is the same two minutes as the first flash.
The likeliest snags, keyed to the build steps above.
| What you see | Step | Try this |
|---|---|---|
| Parts warp, or a ring won't seat in its seat | 1 | Slow the print, check bed adhesion. A little cleanup of stringing around the seats is normal. |
| Everything lights, but the hands are on the wrong rings | 2 | Chain order. It has to be 60, then 24, then 12, then the center pixel, each ring's DOUT into the next ring's DIN. Any other order and the firmware's indexes land on the wrong ring. |
| One ring works, everything after it stays dark | 2 | A joint failed at that point in the chain. Data only flows one way through these rings, so the break is at the DOUT of the last ring that works, or the DIN of the first that doesn't. |
| Something smells hot | 2 | Kill power immediately. Continuity-test 5V to GND before powering up again. |
| No serial port shows up when flashing | 3 | Use a USB-C cable that carries data, not a charge-only one. Close anything else holding the port (serial monitor, Arduino IDE). |
| Rings never turn blue after a flash | 3 | Reseat the cable and flash again. The rings feed from the XIAO 5V pin, so if they never light, check that joint and the data line. A weak computer USB port may not carry full demo brightness; a 2A charger will. |
esp32c3-v3-8inch.local won't open |
4 | Use the clock's IP from your router's device list. Some networks block mDNS name lookup. |
| Time is wrong by whole hours | 5 | Set the time zone in step 5. A missing or bad zone falls back to UTC. |
| Light looks patchy or single dots show through | 6 | That's the front diffuser. Check it printed solid with no sparse gap in the middle, and that the surface fill came out Monotonic and not Concentric. Thickness is worth a couple of tries. See docs/PRINTING.md. |
- docs/HARDWARE.md: pins, LED mapping, power, construction
- docs/PRINTING.md: print settings and the diffuser
- docs/FEATURES.md: every feature, current and planned
- docs/ANIMATIONS.md: animation catalog and triggers
- docs/API.md: web endpoints, settings JSON, client examples
- docs/TROUBLESHOOTING.md: when it doesn't work
- docs/ARCHITECTURE.md: codebase structure, for contributors
- docs/FOCUS_REMINDERS.md: the focus-nudge feature in depth
- docs/HISTORY.md: the full decade-long design story
- docs/CHANGELOG.md: version history
One person built and maintains this as a hobby project. Support is best effort. Open an issue with the bug report or build help template and I'll get to it when I can. No SLA, no promises, but I do read everything.
If ChronoBloom saved you time, you can buy me a coffee. Never expected, always appreciated.
Steve Manley built the original NeoPixel Ring Clock in 2015 (Arduino Nano, DS3234 RTC, 3D printed frame). The electronics weren't the draw (ESP32s and addressable LEDs were already familiar territory). It was his 3D-printed design: the way the reflector shapes and throws the LED glow into crisp pointed hands, like a real clock. The printed reflector in this repo, the part that casts and shapes the light, is a remix of his design. The front diffuser is a separate part and a separate job, and that one is mine.
From there, a decade of builds by Maestro8484:
- First edition: Arduino Nano + RTC + two buttons. Setting time through interrupt-driven buttons was fiddly, but it ran for 2-3 years.
- ESP8266 port: same clock, new brain. Ran fine for years; never needed WiFi features.
- 8" build: the replicable one, and what this repo targets. Sized until the off-the-shelf rings seated precisely. Largest part measures 209 mm square, about 8 inches, which is where the name comes from. Alongside it, a custom 10" glow-in-dark wall clock built around Steve's reflector with UV LEDs behind the frame.
- 15" build: the 8" design scaled ~198% so the outer ring pitch exactly matches side-lit WS2812B strip LED spacing. Much print-and-diffuser trial and error; parchment paper beat every 3D-printed diffuser from 0.8mm down to 0.2mm.
- ChronoBloom (2026): ground-up rewrite on the XIAO ESP32-C3: web UI, NTP, OTA, lux-sensor auto-brightness, Focus Reminders. The two buttons stay as a hardware fallback.
Thanks to Steve for the design that started all of this. Attribution: NOTICE. Full story: docs/HISTORY.md.
Firmware: Apache 2.0. Hardware/STL files: CC BY 4.0.